Tools & materials you'll need
Affiliate linksAs an Amazon Associate FixlyGuide earns from qualifying purchases — at no extra cost to you. Prices and availability are accurate as of publication and subject to change.
Quick Answer
Installing a kitchen backsplash is a surprisingly achievable DIY project that can dramatically refresh your kitchen's appearance and protect your walls from splashes and spills. The key to success lies in meticulous planning, proper surface preparation, precise tile setting, and careful grouting. By following a step-by-step approach, even first-time tilers can achieve professional-quality results, transforming their kitchen in as little as a weekend.
The Problem
Bare kitchen walls behind sinks and cooktops are prone to damage from water, grease, and food splatters. This not only looks untidy but can lead to long-term issues like mold growth, damaged drywall, and paint deterioration. A backsplash provides a protective, easy-to-clean barrier, preventing these problems while adding a significant decorative element to your kitchen. Many homeowners are intimidated by the idea of tiling, fearing uneven lines, messy grout, or the cost of hiring a professional. However, with the right guidance, installing a backsplash is a project well within the capabilities of most DIYers, offering substantial savings and the satisfaction of a job well done.
How It Works
A tile backsplash works on a few fundamental principles. First, it creates a waterproof or water-resistant barrier that protects the underlying wall material (typically drywall) from moisture. This is achieved by adhering tiles with a waterproof or water-resistant thin-set mortar and then filling the gaps between tiles with grout, which adds further protection. Finally, the perimeter edges are sealed with a silicone caulk to prevent water intrusion where the backsplash meets countertops, cabinets, and outlets.
The process begins with preparing the substrate. This means ensuring the wall surface is clean, dry, flat, and structurally sound. Any loose paint, grease, or debris must be removed, and significant imperfections should be patched. The thin-set mortar, a cement-based adhesive, is mixed with water to a peanut butter-like consistency. This consistency is crucial; too thin, and the tiles will slip; too thick, and it won't bond properly. The thin-set is applied to the wall using a notched trowel, creating ridges that help the mortar adhere to both the wall and the tile, ensuring a strong bond and a consistent depth.
Tiles are then pressed firmly into the thin-set, and spacers are used to maintain uniform grout lines. After the thin-set cures for 24-48 hours, the spacers are removed, and grout is applied. Grout is a cement-based mixture (or epoxy-based for enhanced stain resistance) that fills the gaps, locking the tiles in place and completing the protective barrier. Excess grout is wiped away, and after the grout cures, it's often sealed to resist stains and moisture. Finally, flexible silicone caulk is applied at all transitions to accommodate movement and prevent water from seeping behind the tiles.
Step-by-Step Fix
1. Plan Your Layout – Measure twice, cut once.
Before buying any tile, measure the total wall area you intend to cover (height x width). Sketch your layout, considering where full tiles will fall and minimizing awkward cuts. Account for outlets and switches. Purchase at least 10-15% extra tile for cuts, mistakes, and future repairs.
- Calculate: Use a tape measure to determine linear feet and square footage. Snap a chalk line or use a level to mark your starting point, usually the center or a corner.
- Dry Fit: Lay out a few tiles on a flat surface or tape them to the wall to visualize the pattern and make sure your calculations are correct.
2. Prepare the Wall Surface – A clean, flat canvas is key.
Your wall must be clean, dry, and free of any grease, peeling paint, or debris. Remove all outlet and switch covers. Patch any significant holes or cracks with drywall compound and sand smooth. For painted walls, a light sanding with 150-grit sandpaper can help the thin-set adhere better.
- Safety First: Turn off power to outlets and switches at the breaker. Use painter's tape to protect countertops and cabinets.
- Degrease: Wipe down walls with a degreaser like TSP (trisodium phosphate) substitute, then rinse thoroughly. Ensure the wall is completely dry before proceeding.
3. Mix the Thin-Set Mortar – Achieve the right consistency.
Follow the manufacturer's instructions for mixing powdered thin-set with water. Use a drill with a mixing paddle. Aim for a consistency like peanut butter – it should hold its shape on a trowel without dripping but still be smooth and spreadable. Mix small batches to avoid it drying out.
- Tools: Use a 5-gallon bucket and a heavy-duty drill with a mixing paddle. Add water gradually.
- Cure Time: Note the working time on your thin-set package; typically 30-60 minutes.
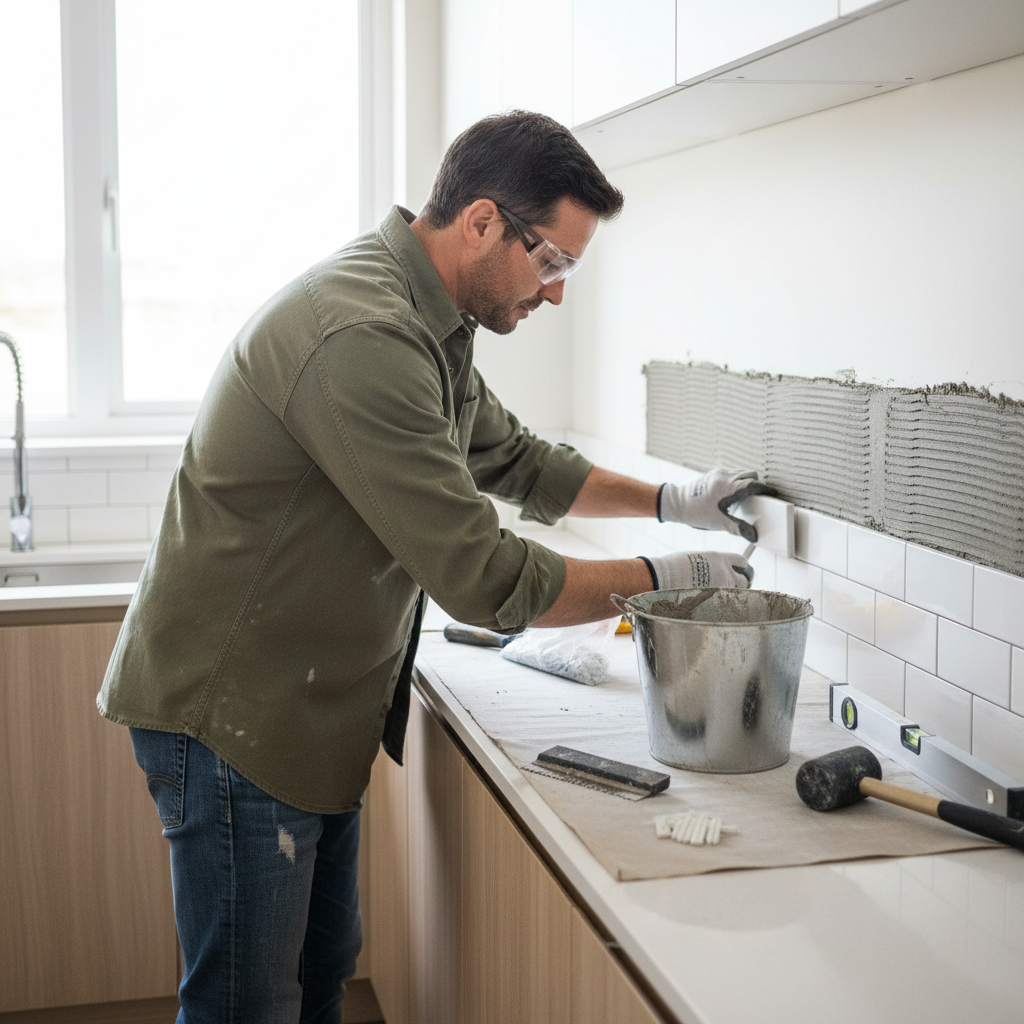
4. Apply Thin-Set and Set First Tiles – Start strong and level.
Using the flat side of your notched trowel, spread a thin layer of thin-set onto a small section of the wall (about 2-3 square feet). Then, switch to the notched side and comb the thin-set horizontally, creating uniform ridges. Press your first tile firmly into the mortar, using a slight twisting motion. Use tile spacers to maintain consistent gaps. Work in small sections.
- Notch Size: The trowel notch size depends on your tile size; generally, 1/8-inch or 3/16-inch for most backsplashes.
- Level Check: Regularly use a level to ensure tiles are straight, both horizontally and vertically. Adjust as needed.
5. Cut Tiles as Needed – Precision for a polished look.
For cuts around outlets, corners, or ends of rows, you'll need the right tool. A wet saw is ideal for clean, straight cuts, while tile nippers or a snap cutter can work for simpler cuts or mosaic pieces. Always wear safety glasses when cutting tiles.
- Safety: Always wear eye protection. Use a wet saw in a well-ventilated area and follow all safety instructions.
- Marking: Measure and mark your cuts precisely with a pencil or marker. For outlet cutouts, create a template first.
6. Continue Tiling and Allow to Cure – Patience pays off.
Work your way across the wall, setting tiles and using spacers. Periodically step back to check for alignment and address any unevenness. Once all tiles are set, remove any excess thin-set from the grout lines before it dries completely. Allow the thin-set to cure for at least 24-48 hours, or as directed by the manufacturer, before grouting.
- Wiping: A damp sponge is your best friend for cleaning up thin-set before it hardens.
- Uneven Tiles: Use a rubber mallet and a wood block to gently tap down any tiles that sit slightly proud, ensuring a flush surface.
7. Mix and Apply Grout – Fill the gaps and fortify.
Mix the grout according to the manufacturer's instructions to a smooth, workable consistency, similar to cake batter. Use a rubber grout float to spread the grout diagonally across the tile surface, forcing it deep into the grout lines. Work in small sections, ensuring all gaps are completely filled.
- Type of Grout: Sanded grout for lines wider than 1/8 inch, unsanded grout for lines 1/8 inch or narrower.
- Clean Up: A damp sponge is essential for wiping excess grout off the tile surface. Keep a bucket of clean water handy and rinse your sponge frequently.
8. Clean and Polish Tiles – Reveal the beauty.
After applying grout to a section, wait about 10-20 minutes for it to set slightly (it should still be workable but not sticky). Use a damp (not wet) sponge to wipe the excess grout off the tile surface in a circular motion. Rinse the sponge frequently. Once the grout has cured for about 24 hours, a hazy film (grout haze) may appear. Polish the tiles with a clean, dry cloth or a specialized grout haze remover.
- Timeliness: Don't wait too long to clean up excess grout, or it will be much harder to remove.
- Residue: If haze persists, use a grout haze remover following product directions.
9. Seal the Grout (Optional but Recommended) – Protect your investment.
Once the grout is fully cured (check manufacturer's recommendations, usually 48-72 hours), apply a grout sealer. This penetrates the grout, making it resistant to moisture and stains. Apply with a small brush or applicator as directed, wiping off any excess from the tile surface before it dries. Reapply sealer every 1-2 years.
- Penetrating Sealer: Choose a high-quality penetrating sealer for best results.
- Testing: Test a small, inconspicuous area first to ensure there's no discoloration.
10. Caulk the Edges – The final, flexible seal.
Apply a bead of mildew-resistant silicone caulk where the backsplash meets the countertop, cabinets, and any vertical seams (e.g., at corners). Use painter's tape to create clean caulk lines, if desired. Smooth the caulk with a wet finger or a caulk tool immediately after application. This flexible seal prevents water from entering these critical transition points.
- Matching: Choose caulk in a color that matches your grout or countertop for a seamless look.
- Preparation: Ensure surfaces are clean and dry for optimal caulk adhesion.
Common Causes
Many common issues with backsplashes stem from improper installation or neglecting crucial steps. For example:
- Uneven Tiles: Often caused by an uneven wall surface, inconsistent thin-set application, or not using a level frequently during installation.
- Cracked Grout: Can result from insufficient thin-set coverage, movement in the substrate, or using the wrong type of grout (e.g., unsanded grout for wide joints).
- Failing Adhesion: Typically due to inadequate wall preparation (grease, dirt, loose paint), using old or improperly mixed thin-set, or not pressing tiles firmly enough.
- Water Intrusion: Almost always the result of skipping or improperly applying caulk at edges and corners, allowing water to seep behind the tiles.
- Grout Haze: Not wiping excess grout off the tiles effectively enough or soon enough after application.
Common Mistakes
- Skipping Wall Prep: Laying tile over dirty, uneven, or greasy walls is a recipe for disaster. The thin-set won't bond properly, leading to loose or cracked tiles.
- Mixing Too Much Thin-Set/Grout: These materials have a limited working time. Mixing large batches means they'll start to harden before you can use them all, leading to wasted material and a rushed, sloppy job.
- Ignoring a Level: Eye-balling it rarely works. Without constantly checking for level and plumb, your tile lines will drift, creating a noticeable, unprofessional look.
- Not Using Spacers: Uniform grout lines are critical for a professional finish. Without spacers, your gaps will be inconsistent, making the backsplash look handmade (not in a good way).
- Improperly Cleaning Grout: Wiping too soon can pull grout out of the joints; wiping too late results in stubborn grout haze. Finding the sweet spot and keeping your sponge clean is crucial.
- Forgetting to Caulk: Grout is rigid and will crack at changes in plane (like where the backsplash meets the counter) due to slight movement. Flexible caulk is essential to maintain a waterproof seal.
Cost & Time Breakdown
| Task | DIY Cost ($) | Pro Cost ($) | Time (Hours) |
|---|---|---|---|
| Wall Prep & Layout | $0–$10 | (Included) | 1–2 |
| Tile & Thin-Set | $100–$400 | (Included) | 4–8 |
| Grout & Sealer | $30–$80 | (Included) | 2–4 |
| Tool Rental (Wet Saw, Mixer) | $50–$100 | (Included) | 0 |
| Total (Approx. for 20 sq ft) | $180–$590 | $500–$1500 | 7–14 |
Note: 'Pro Cost' includes materials and labor. DIY cost savings are significant.
Tips & Prevention
- Practice Cuts: If you're new to using a wet saw or snap cutter, practice on a few scrap tiles to get a feel for the tool before making critical cuts.
- Use a Laser Level: For the most accurate and easiest layout, especially for long runs, a self-leveling laser level can project perfectly straight lines.
- Back Buttering: For larger or heavier tiles, spread a thin layer of thin-set on the back of the tile in addition to the wall. This ensures better adhesion and full coverage.
- **Keep a
Related Articles
Keep troubleshooting with these hand-picked guides from FixlyGuide:
- The 7 Mistakes First-Time DIYers Make When Installing a Kitchen Backsplash — Learn the common pitfalls and smart solutions for installing a kitchen backsplash, transforming your space with confidence and avoiding cos…
- The #1 Mistake First-Timers Make Installing a Backsplash (and How to Fix It) — Avoid the most common first-timer backsplash mistake: uneven tiles. Learn precise techniques for a professional-looking finish.
- The 3 Hidden Reasons Your Baseboards Are Pulling Away (And How to Fix It FAST) — Don't ignore separating baseboards—they’re not just an eyesore. Learn the surprising culprits behind the gaps and how to permanently fix th…
- The Tiny Gap Behind Your Baseboards That Costs You $100s in Drafts — Discover why your baseboards are pulling away from the wall and the simple, inexpensive fixes that can seal drafts and improve your home's…
- The 3 Hidden Reasons Your Baseboards Are Pulling Away (And How to Fix It Right) — Don’t just nail it back! Discover the real reasons your baseboards are separating from the wall and how to achieve a lasting repair.
- The #1 Mistake Homeowners Make When Sealing a Deck (and How to Fix It) — Prevent costly damage and extend your deck's life by avoiding common sealing errors and following a simple, effective resealing process.
Frequently asked questions
How long does it take to install a kitchen backsplash?+
For an average-sized kitchen, a DIY backsplash installation can take one to two full days of active work, spread over a weekend. This includes time for prep, tiling, and grouting, plus curing times between steps.
Do I need to remove old drywall before installing a backsplash?+
Not usually. If your drywall is flat, clean, and in good condition, you can tile directly over it. However, if there's significant damage, mold, or extensive unremovable grease, you might need to repair or replace sections of drywall first.
What's the difference between sanded and unsanded grout?+
Sanded grout contains fine sand particles, making it stronger and less prone to shrinking, ideal for grout lines 1/8 inch or wider. Unsanded grout is smoother and works best for tighter grout lines, typically 1/16 to 1/8 inch. Using unsanded grout in wide joints can lead to cracking.
Can I install a backsplash over existing tile?+
While technically possible by proper surface preparation (degreasing, sanding, and using specialized primers/adhesives), it's generally not recommended for beginners. Tiling over existing tile can add thickness, create uneven surfaces, and make future removal more difficult. It's usually best to remove the old tile first.
How often should I seal my grout?+
Most penetrating grout sealers require reapplication every 1-2 years, especially in high-moisture or high-traffic areas like a kitchen backsplash. Some heavy-duty sealers may last longer, so always check the manufacturer's specific recommendations.


Discussion
Loading comments…