Tools & materials you'll need
Affiliate linksAs an Amazon Associate FixlyGuide earns from qualifying purchases — at no extra cost to you. Prices and availability are accurate as of publication and subject to change.
Quick Answer
A dripping single-handle faucet is typically caused by degraded rubber O-rings, seals, or a worn-out ceramic cartridge within the faucet's mixing mechanism. The most effective fix involves turning off the water supply, disassembling the faucet's handle and spout, replacing the faulty internal components with a new repair kit or cartridge, and then reassembling the faucet. This common repair can often be completed in less than 30 minutes with basic tools, saving water and preventing aesthetic damage to your sink.
The Problem
A persistent drip from your kitchen or bathroom's single-handle faucet is more than just an annoying sound; it's a silent drain on your wallet and a waste of precious resources. Even a slow drip can waste hundreds of gallons of water per year, leading to higher water bills and potential staining or mineral buildup on your sink basin over time. The problem stems from the internal components designed to control water flow and temperature. With constant use, these rubber seals, springs, O-rings, or the entire ceramic cartridge can wear down, crack, or accumulate mineral deposits, preventing a complete seal when the faucet is in the "off" position.
The tell-tale sign is, of course, the drip itself. It might be a slow, steady plink, plink, plink, or a more rapid trickle. The key is that the water continues to escape even when the handle is fully closed. Identifying and addressing this issue promptly not only conserves water but also extends the life of your faucet by preventing further damage to its internal mechanisms and surrounding fixtures.
How It Works
Single-handle faucets operate on one of several core principles to mix hot and cold water and control flow with a single moving part. Understanding how your specific faucet works is crucial for a successful repair. Most single-handle faucets fall into one of three categories: ball, cartridge, or ceramic disc.
Ball Faucets: These are common in older kitchens. A rotating metal or plastic ball inside the faucet body has slots and ports that align with corresponding hot and cold water inlets and the spout outlet. Two rubber seats and springs press against the ball, creating a watertight seal. When you move the handle, the ball rotates, allowing varying amounts of hot and cold water to mix and flow out. Leaks often occur when these rubber seats and springs harden, crack, or get coated in mineral deposits, failing to create a tight seal against the ball.
Cartridge Faucets: Perhaps the most ubiquitous type today, these faucets use a cylindrical cartridge, often made of plastic or ceramic, that moves up and down and rotates within the faucet body. The cartridge itself contains a series of ports and channels that control the water flow. When you lift the handle, the cartridge moves, allowing water to flow. When you rotate it, hot and cold water mix. Wear and tear on the rubber O-rings surrounding the cartridge, or internal damage to the cartridge's valve mechanism, are common culprits for leaks.
Ceramic Disc Faucets: These are a more modern and highly durable option, often found in higher-end fixtures. They utilize two highly polished ceramic discs. One disc is stationary, while the other moves with the handle. Tiny holes in the discs align to allow water to flow. When the faucet is off, the holes are sealed by the precise fit of the discs. Due to their hard nature, ceramic discs rarely wear out, but fine mineral deposits or tiny chips can compromise the seal, leading to drips. More commonly, the rubber seals or gaskets beneath the ceramic cartridge can degrade.
In all these designs, the fundamental principle is that a set of tightly fitting components creates a seal to prevent water flow when the handle is closed. When this seal is compromised, whether by worn rubber, mineral buildup, or internal damage, the drip begins.
Step-by-Step Fix
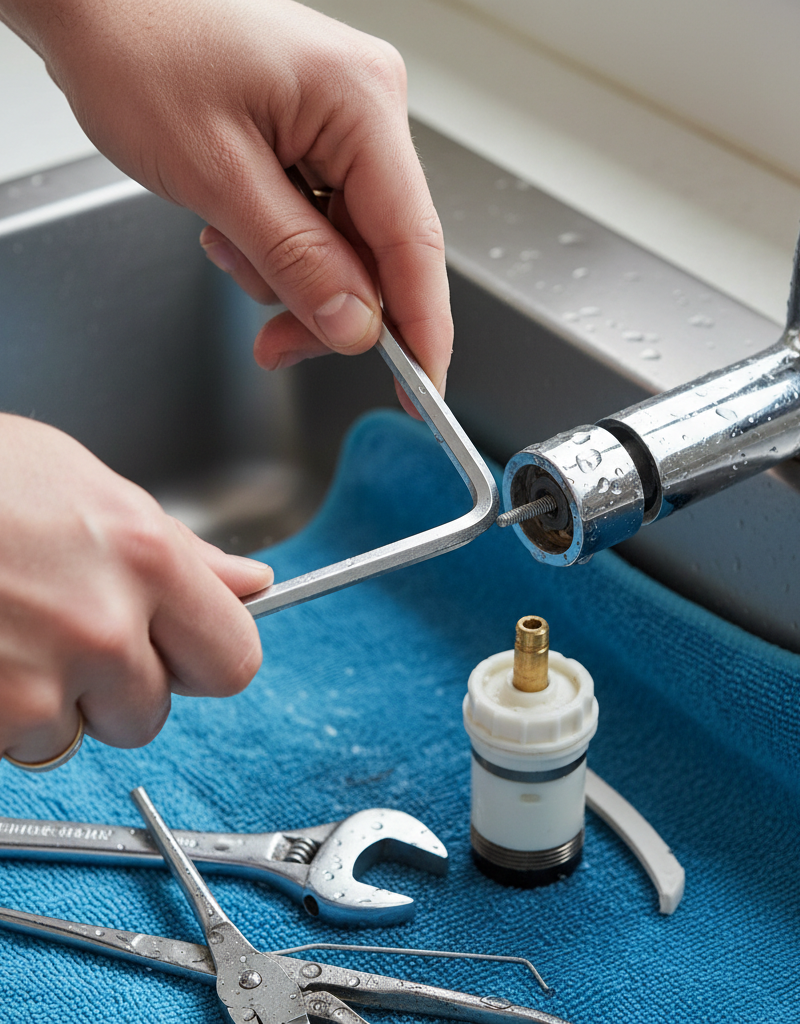
Safety First: Before beginning any plumbing work, always turn off the water supply to the faucet. Look for the hot and cold shut-off valves typically located under the sink. Turn them clockwise until hand-tight. If you can't find individual shut-off valves, you'll need to turn off the main water supply to your house. Open the faucet to drain any residual water from the lines.
-
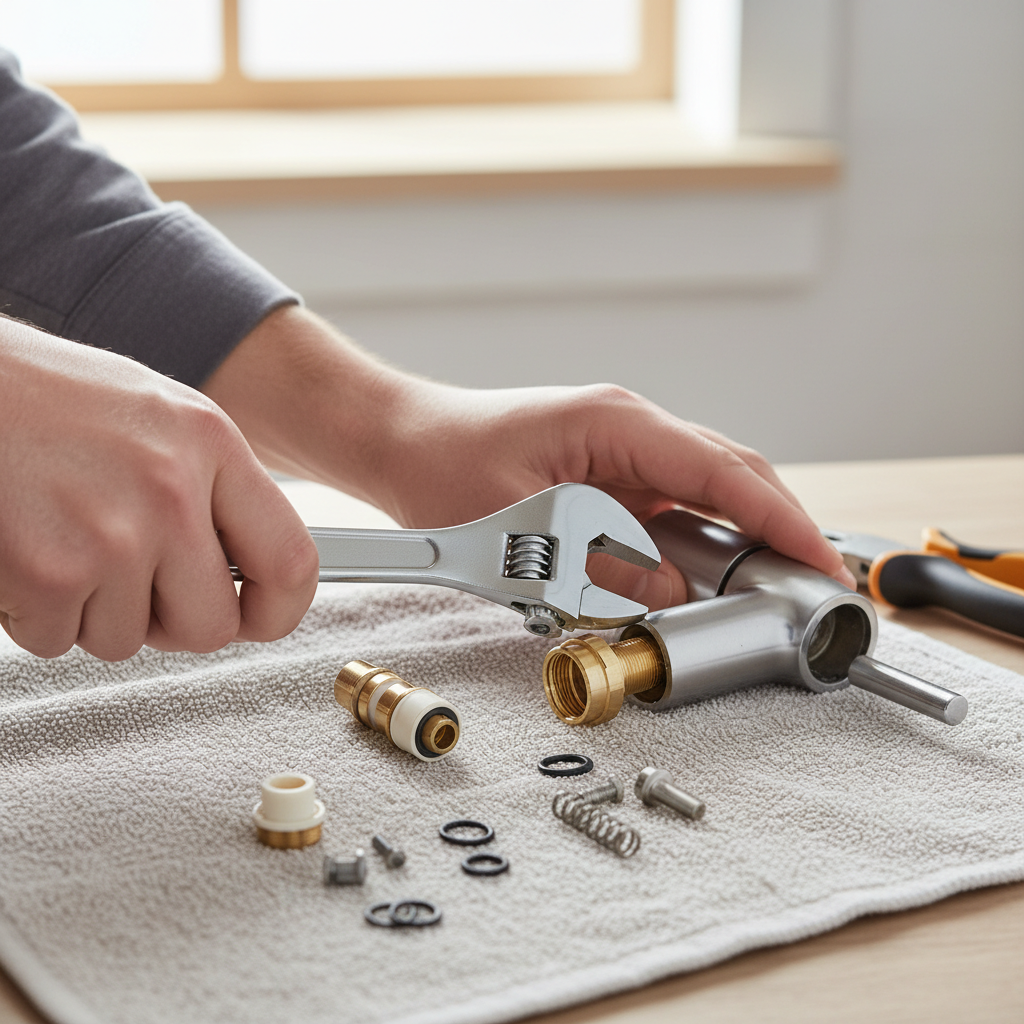
Remove the Handle Cap and Screw – Most single-handle faucets have a decorative cap (often plastic, sometimes covering a colored hot/cold indicator) that hides a set screw. Pry this cap off gently with a small flat-head screwdriver or your fingernail. Once exposed, use a Phillips screwdriver or an Allen wrench (hex key) to loosen and remove the handle screw. Keep all screws and small parts in a cup or on a rag to prevent them from rolling away.
- Tip: If the screw is stubborn, apply a penetrating oil (like WD-40) and let it sit for 15 minutes.
- If your faucet is a compression type: It will have a packing nut under the handle, not a single screw.
-
Lift Off the Handle Assembly – With the screw removed, the handle should lift straight up and off the faucet body. Sometimes it might be stuck due to mineral buildup. Gently rock it back and forth while pulling upwards. Avoid excessive force, which can damage the faucet or handle.
- If it's seized: A handle puller tool (available at hardware stores) can help, but for most DIYers, patience and gentle wiggling are sufficient.
-
Expose the Faucet's Inner Workings – Depending on your faucet type, you'll now see different components:
- Ball Faucet: You'll see a cap and collar (often with notches) that holds the ball valve in place. You might need to unscrew this collar by hand or with groove-joint pliers. Inside, you'll find the ball, along with springs and rubber seats.
- Cartridge or Ceramic Disc Faucet: There will usually be a decorative escutcheon or dome that unscrews to reveal the cartridge nut or retaining clip. Use an adjustable wrench to carefully unscrew the retaining nut or use needle-nose pliers to remove the clip.
- Safety Note: Be careful not to scratch the finish of your faucet when using tools. Wrap the jaws of your wrench with electrical tape or a cloth.
-
Remove the Old Cartridge/Ball Assembly – Carefully pull out the cartridge or ball assembly. For cartridges, you might need to gently twist and pull. Some cartridges have a small tab that needs to be aligned for removal. Make a note of its orientation. For ball faucets, remove the ball, springs, and rubber seats. Examine all removed parts for chips, cracks, or excessive wear.
- Crucial Step: Take pictures with your phone as you disassemble the faucet. This will be invaluable for reassembly.
-
Identify and Purchase Replacement Parts – The most critical step. Take the worn cartridge, ball, O-rings, and springs to your local hardware store or plumbing supply. Faucet manufacturers use proprietary parts, so bringing the old components ensures you get the correct match. Ask for a "faucet repair kit" for your specific brand and model if possible, or individual O-rings and seals.
- Pro Tip: If you can't identify the brand or model, try to find a distinguishing feature like
Related Articles
Keep troubleshooting with these hand-picked guides from FixlyGuide:
- The 30-Minute Trick to Stop Your Single-Handle Faucet Drip (And What Plumbers Charge if You Don't) — A persistent drip from a single-handle faucet often signals a worn-out cartridge, a common issue homeowners can fix with basic tools in und…
- The 5-Minute Trick to Stop a Dripping Single-Handle Faucet (No Plumber Needed) — A persistent drip from your single-handle faucet is usually caused by a worn-out cartridge, a repair you can typically complete yourself in…
- The $5 Secret to Fixing Your Drip: Why Single-Handle Faucets Leak (and the O-Ring Trick) — A persistent drip from your single-handle faucet is often caused by worn-out O-rings or seals, a common issue with a simple, inexpensive DI…
- The $5 Single-Handle Faucet Fix Plumbers Don't Want You to Know — Stop that annoying drip! Most single-handle faucet leaks are caused by worn-out O-rings or seals, a repair homeowners can easily tackle in…
- The 1 Common Reason Your Single-Handle Faucet Leaks (And How to Fix It in 30 Minutes) — A persistent drip from a single-handle faucet is usually caused by a worn-out cartridge, a component that’s easy and inexpensive to replace.
- The 4 Hidden Reasons Your Doorbell Dies (And the 20-Minute Fix) — A non-working doorbell is often caused by simple, hidden issues like a tripped transformer or a corroded button, which homeowners can fix i…
Get the print-ready PDF of this guide
A clean, ad-free, printable version you can keep on your phone or pin to the workshop wall. We'll also send occasional weekly tips matched to your home situation.
- Print-optimized layout
- Tools, materials & every step included
- Unsubscribe anytime
Frequently asked questions
Why is my single-handle faucet dripping?+
A single-handle faucet usually drips due to worn-out rubber O-rings, seals, or a damaged ceramic cartridge inside the faucet body. These components are designed to create a watertight seal, and over time, they can degrade, allowing water to escape.
Can I replace just parts of a faucet, or do I need a new one?+
For most dripping single-handle faucets, you can typically replace internal components like the cartridge, O-rings, or seals with a repair kit. You do not usually need to replace the entire faucet unless the body itself is cracked or severely corroded.
How do I know what kind of faucet cartridge I need?+
The best way to identify the correct faucet cartridge is to remove the old one and take it to a plumbing supply store or hardware store. They can help you match it to the correct replacement, often requiring the specific brand and model of your faucet.
What tools do I need to fix a leaky single-handle faucet?+
You'll typically need a small flat-head screwdriver, a Phillips head screwdriver, an Allen wrench (hex key) set, an adjustable wrench (or Groove Joint Pliers), and possibly needle-nose pliers. Plumber's grease and a cleaning pad are also recommended.
How long does it take to fix a dripping single-handle faucet?+
For most homeowners with basic DIY skills, fixing a dripping single-handle faucet takes about 20-45 minutes, assuming you have the correct replacement parts on hand.


Discussion
Loading comments…