
Tools & materials you'll need
Affiliate linksAs an Amazon Associate FixlyGuide earns from qualifying purchases — at no extra cost to you. Prices and availability are accurate as of publication and subject to change.
Quick Answer
After a hailstorm, immediately inspect your siding for damage, focusing on dents, cracks, and chips. The wind direction during the storm often determines which sides of your house are most affected. Document all damage with detailed photographs for insurance purposes. Minor dings and scuffs can often be repaired by cleaning, lightly sanding, and applying matching paint. For more significant but localized damage, specific siding panels (vinyl, aluminum, wood) can often be replaced. For widespread or structural damage, professional assessment and repair are crucial.
The Problem
Hailstorms, even seemingly minor ones, can leave a trail of invisible destruction on your home's siding. What might look like just a few dings can actually compromise the integrity of your exterior, leading to much larger problems down the line. Hidden problems include weakened panels susceptible to cracking, breached protective coatings allowing moisture intrusion, and even subtle shifts in panel alignment that create vulnerabilities. Ignoring these issues often leads to rot, mold, pest infestations, and escalating repair costs. The real pain point for homeowners often isn't the visible damage, but the uncertainty of knowing if their home suffered serious structural or cosmetic harm, and whether or not it's covered by insurance. This guide empowers you to assess the damage like a pro and tackle the repairs (or know when to call one) before a small ding becomes a major disaster.
How It Works
Siding, regardless of its material, acts as your home's primary shield against the elements. When hail strikes, the impact energy is absorbed by the siding material. The extent of the damage depends on several factors: hail size, wind speed, hail density (ice vs. slush), and the type and age of your siding.
Vinyl siding, a popular choice, is made from PVC (polyvinyl chloride). It's designed to be flexible and durable, but extreme impacts can lead to cracks, chips, or holes. Unlike subtle dents, vinyl damage often presents as clearly defined breaks due to its rigid nature. Cold temperatures can make vinyl brittle, increasing its susceptibility to cracking.
Aluminum siding is more prone to denting, creating distinct dimples or craters where hail has struck. While aluminum won't crack like vinyl, these dents can compromise its protective coating, leading to corrosion over time if not addressed. The paint finish can also chip or flake off at the impact points.
Wood siding, whether clapboard, shingles, or shakes, absorbs impact differently. Hail can cause divots, splintering, or bruising of the wood fibers. The paint or stain finish can also be chipped away, exposing the bare wood to moisture and increasing the risk of rot and decay if left untreated.
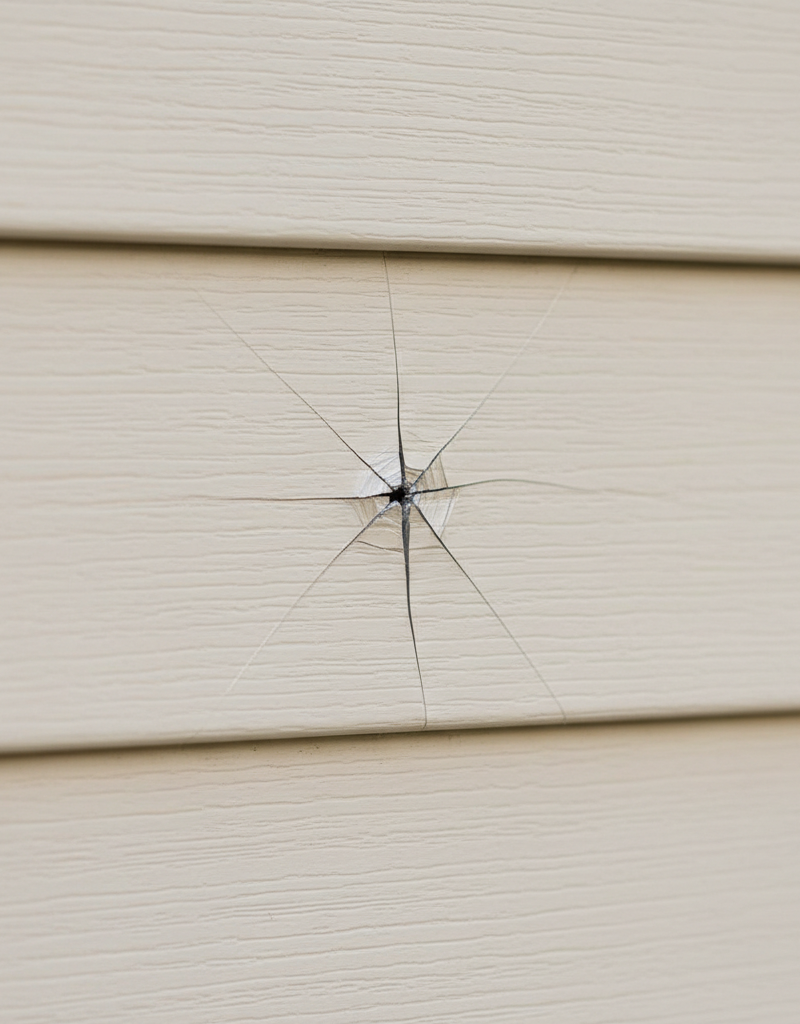
Fiber cement siding, like HardiePlank, is extremely durable, made from cement, sand, and cellulose fibers. It's highly resistant to hail but can still chip or crack under severe impact, especially at edges or corners. Damage often looks like circular chips or spiderweb cracks on the surface.
Understanding how each material reacts helps in accurately identifying and assessing the damage, which is the first crucial step in any repair process. The goal is to restore the siding's protective barrier and aesthetic appeal, preventing further deterioration of your home's exterior envelope.
Step-by-Step Fix
1. Safety First — Before you do anything, ensure your safety.
Always be aware of your surroundings. If working at heights, secure your ladder properly on stable, level ground. Have a spotter if possible. Wear appropriate safety gear including work gloves, safety glasses, and sturdy shoes, especially when handling sharp or splintered materials.
2. Document the Damage — Capture clear, detailed evidence for insurance.
Walk around your entire house, taking photos and videos of all damaged areas. Get close-up shots of individual dents, cracks, and missing pieces, as well as wider shots showing the general areas affected. Note the date, time, and approximate hail size. Make sure your photos are well-lit and in focus. Also, check other exterior elements like gutters, downspouts, windows, and roof vents, as hail often affects multiple components. This documentation is critical for any insurance claim.
3. Clean the Damaged Area — Prepare the surface for effective repair.
For minor scuffs or dirt, gently clean the area with a soft brush, a mild detergent solution (like dish soap and water), and a soft cloth. Rinse thoroughly with clean water. For more stubborn grime or loose debris around impact points, a stiffer nylon brush might be needed, but avoid harsh scrubbing that could worsen the damage. Let the area dry completely before proceeding.
4. Repair Minor Dents (Aluminum Siding) — Carefully work out small indentations.
For small, shallow dents in aluminum siding, you might be able to gently push them out from the underside if you can access it, or use a soft rubber mallet and a block of wood on the exterior to tap around the dent's edges, gradually relieving the stress and popping it back into place. Be very cautious to avoid creating new dents or creases. For deeper dents, a body filler kit designed for metal can be used. Sand the area, apply filler, sand smooth, and then paint.
5. Patch Small Holes or Cracks (Vinyl/Fiber Cement/Wood) — Fill and seal minor breaches.
- For vinyl: Small cracks or holes can sometimes be repaired with a vinyl repair kit, which typically includes a matching caulk or filler. For small cracks, a color-matched exterior-grade caulk can be applied. For larger holes, a repair patch can be cut from a similar piece of vinyl siding, glued into place with PVC cement, and then sealed with caulk. Ensure the patch overlaps the damaged area slightly.
- For fiber cement: Use an exterior-grade patching compound specifically designed for fiber cement. Smooth it flush with the surface using a putty knife. Once dry, sand lightly and prepare for painting.
- For wood: Fill divots or cracks with exterior wood filler. Sand smooth once dry. If wood is splintering, use wood glue to reattach splinters and clamp until dry, then fill any remaining gaps.
6. Sand and Prime (If Applicable) — Create a smooth, adhesive base.
If you've used any fillers or if the original paint is chipped and rough, lightly sand the repaired area with fine-grit sandpaper (180-220 grit) until smooth. Feather the edges of the repair into the surrounding undamaged area. Wipe away all sanding dust, then apply a high-quality exterior primer to the repaired spots. This ensures good adhesion for the new paint and creates a uniform surface.
7. Touch-Up Paint — Restore the aesthetic and protective layer.
Using paint that precisely matches your existing siding color, carefully apply it to the primed and repaired areas. Apply several thin coats rather than one thick coat, allowing each to dry according to the manufacturer's instructions. If you don't have original paint, take a small, undamaged piece of siding to a paint store for color matching. For textured siding, try to mimic the original texture during painting.
8. Replace a Damaged Siding Panel (If Necessary) — Swap out sections for severe, localized damage.
- Vinyl siding: Use a siding zip tool to unlock the interlocked panels above the damaged one. Gently pull up the panels and unscrew or pry out the nails holding the damaged panel. Slide out the old panel and slide in the new one, ensuring it locks correctly. Renail and re-zip the panels above. For more detailed instructions on replacing vinyl, see our separate
Related Articles
Keep troubleshooting with these hand-picked guides from FixlyGuide:
- The One Overlooked Mistake After Storm Damage: Finding Missing Roof Shingles Fast — Storms can rip off roof shingles, exposing your home to further damage. Learning how to safely assess and temporarily patch your roof is cr…
- The #1 Mistake Homeowners Make After Finding Missing Shingles (And How to Fix It Right) — Discover the crucial steps to take after a storm rips shingles from your roof, ensuring a proper, lasting repair and preventing costly futu…
- The One Mistake Homeowners Make When Shingles Blow Off (And How to Fix It Fast) — When shingles blow off your roof after a storm, the biggest mistake is waiting; quick, decisive action can prevent far more expensive damag…
- Is Your Gutter Sagging After Every Storm? The Hidden Flaw Most Homeowners Miss — Discover the overlooked reason your gutters sag after every storm and learn the lasting fix that most homeowners miss.
- The #1 Mistake Homeowners Make When Sealing a Deck (and How to Fix It) — Many homeowners make a critical error that prevents their deck sealer from lasting, leading to premature rot and mildew. Learn the right wa…
- The #1 Mistake Homeowners Make When Spotting Soffit Damage — Ignoring early signs of soffit and fascia damage can lead to costly structural issues. Learn to identify and fix common problems the right…
Frequently asked questions
How do you tell if hail damaged your house siding?+
Look for visible impact marks like dents, chips, cracks, or circular fractures. Walk around your house and pay close attention to the side that was facing the hailstorm. Subtle signs include scuffs or missing granules on shingles (if also checking the roof) and dings on soft metal like gutters and downspouts. Inspect from different angles and in varying light conditions to spot subtle blemishes.
How much does it cost to repair hail damaged siding?+
Minor DIY repairs like patching and painting might cost $20-$100 for materials. Replacing a few individual panels could range from $50-$300 for materials alone, depending on the siding type. Professional full-siding replacement due to extensive hail damage can cost $10,000 to $30,000 or more, often covered by homeowner's insurance.
When should I call a professional for hail damage to siding?+
You should call a professional if you notice widespread or severe damage, such as multiple cracked or punctured panels, structural issues, or signs of water intrusion. Also, if you suspect damage but are unsure, or if you plan to file an insurance claim, a professional assessment by a qualified contractor is highly recommended.
Does homeowner’s insurance cover hail damage to siding?+
Most standard homeowner's insurance policies cover hail damage to siding, as it's considered a sudden and accidental peril. However, coverage limits, deductibles, and specific policy terms vary. Always review your policy and contact your insurance provider promptly after discovering damage to understand your options and start the claims process.
How do I prevent hail damage to my siding?+
While you can't prevent hailstorms, choosing impact-resistant siding materials (like thick fiber cement or certain vinyl products), properly maintaining your siding, and promptly repairing any existing damage can reduce susceptibility. Regularly trim trees near your home to minimize falling branch damage during storms. After a storm, a quick inspection can prevent minor issues from worsening.


Discussion
Loading comments…