Tools & materials you'll need
Affiliate links- AmazonStep ladder or extension ladderEnsure it's stable and rated for your weight plus tools.
- AmazonSafety glasses
- AmazonWork gloves
- AmazonStiff wire brushFor cleaning crown and mortar joints.
- AmazonCaulking gun
- AmazonTrowel or putty knifeFor smoothing sealant and mortar.
- AmazonBrick chiselFor removing old mortar.
- AmazonHammer
As an Amazon Associate FixlyGuide earns from qualifying purchases — at no extra cost to you. Prices and availability are accurate as of publication and subject to change.
Quick Answer
A chimney leaking during rain is most often caused by issues with the chimney crown, flashing, or mortar joints, rather than a problem with the roof shingles themselves. Water can penetrate through cracks in the crown, gaps in the flashing, or deteriorated mortar. Identifying the specific source of the leak is crucial for an effective repair.
The Problem
There's nothing quite as alarming as discovering water stains on your ceiling or walls after a heavy rain, only to trace the source back to your chimney. Many homeowners immediately assume the roof itself is to blame, but a leaky chimney often points to specific, isolated issues with the chimney structure which are distinct from the main roofing material. These leaks, if left unaddressed, can lead to significant damage, including deteriorated masonry, rotten framing, damaged drywall, and even mold growth. pinpointing the exact entry point of the water is the first and most critical step, as different causes require different repair strategies. Ignoring these leaks can transform a minor repair into a major — and costly — home renovation.
How It Works
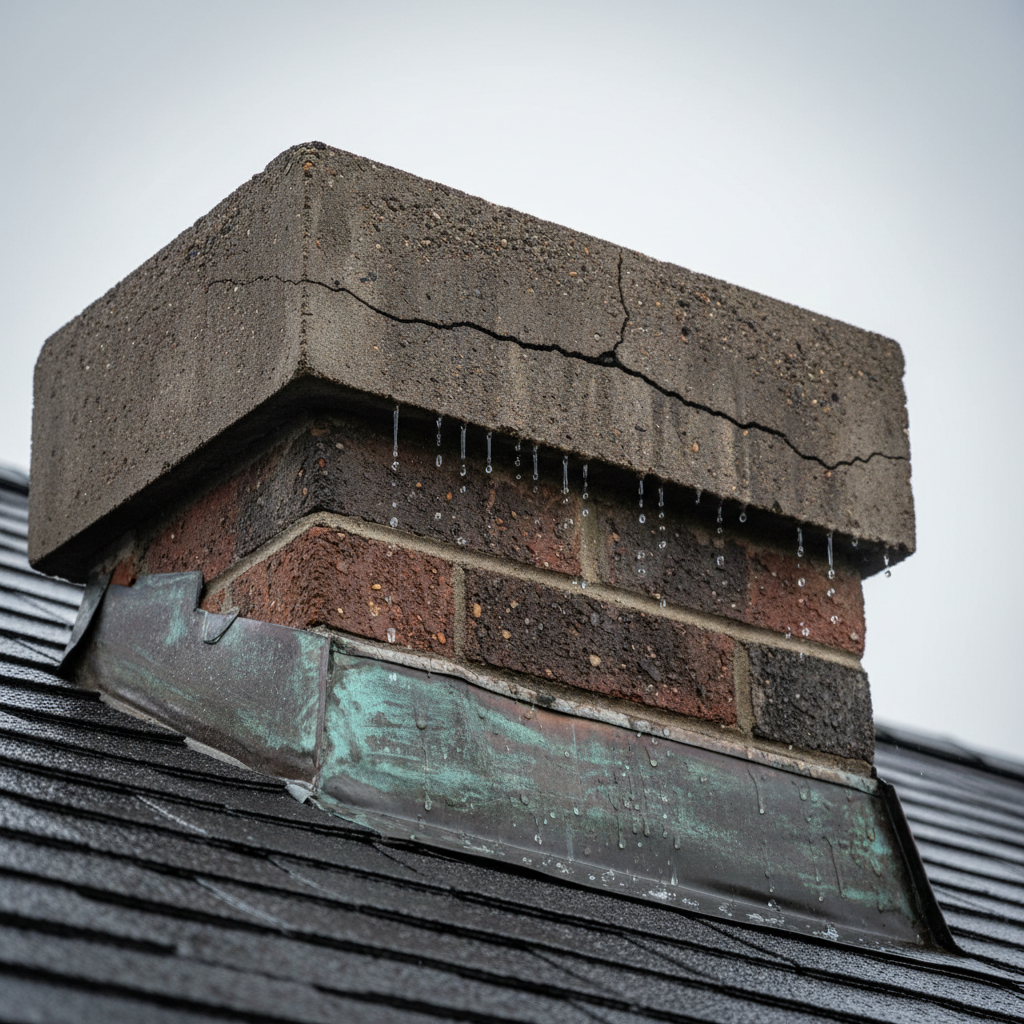
To understand why your chimney might be leaking, it's helpful to understand its components and how they shield your home from the elements. At the very top, the chimney crown acts like a protective cap, sloped away from the flue to shed water. It should extend slightly beyond the chimney chase to create a drip edge, preventing water from running down the sides. Below the crown, the vertical chimney chase is typically constructed of brick or stone, held together by mortar joints. These joints are porous and, over time, can crack and crumble, becoming entry points for water. Further down, where the chimney penetrates the roof, flashing is installed. This critical system typically consists of several layers: step flashing interwoven with shingle courses on the sides, and apron flashing at the bottom. A crucial piece is the counter flashing, which is cut into the chimney's mortar joints and bent down over the step and apron flashing to create a watertight seal. This layered approach allows for slight movement between the chimney and the roof due as they expand and contract at different rates, without compromising the waterproof barrier. Lastly, the caulk or sealant used to seal the counter flashing to the mortar joints, and any sealant around the flue liner, plays a vital role in preventing water ingress. When any of these components fail – whether it's a cracked crown, deteriorated mortar, compromised flashing, or degraded sealant – water finds a clear path into your home, often manifesting as a stain far from the actual point of entry.
Step-by-Step Fix
Safety Note: Working on a roof, especially near a chimney, can be extremely dangerous. Always use a stable ladder, wear appropriate safety gear (non-slip shoes, gloves), and have a spotter if possible. Never work on a wet or icy roof, or during high winds. If you're uncomfortable with heights or feel unsafe, call a professional.
1. Assess the Damage — Carefully inspect your chimney from the ground and with binoculars first.
- Look for visible cracks in the crown, missing or crumbling mortar, damaged bricks, or detached flashing.
- Note the location of interior water stains; this provides clues as to the highest point of entry.
2. Clean the Chimney Crown — Remove debris that can trap water.
- Using a stiff wire brush, sweep away any leaves, twigs, moss, or accumulated dirt from the top of the chimney crown and around the flue.
- Ensure the crown's surface is clean and dry before proceeding with any repairs.
3. Repair Small Cracks in the Chimney Crown — Seal minor fissures before they become major problems.
- For hairline cracks (less than 1/8 inch wide), use a high-quality, exterior-grade elastomeric sealant specifically designed for chimney crowns or concrete.
- Apply the sealant directly into the crack, smoothing it with a trowel or finger (wearing gloves). Ensure a watertight seal.
- If this doesn't work: For larger cracks or severely spalling crowns, a more extensive repair involving a crown resurfacing compound or even a full crown replacement by a professional might be necessary.
4. Repoint Deteriorated Mortar Joints — Fill in gaps where water can seep through brickwork.
- Safety Tip: Wear safety glasses to protect your eyes from dislodged mortar dust.
- Using a brick chisel and hammer, carefully remove any loose or crumbling mortar to a depth of at least 1/2 inch. Undercut the joint slightly to create a good bonding surface.
- Mix new mortar according to manufacturer instructions. Use Type N or Type S mortar for chimney work.
- Using a tuckpointing trowel, firmly press the new mortar into the cleaned-out joints, ensuring it's packed tightly.
- Tool the joint to match the surrounding mortar. Allow it to cure according to manufacturer's recommendations, usually misting lightly with water for several days to aid curing.
- If this doesn't work: If more than 20% of your chimney's mortar joints are deteriorated, a full repointing job by a professional mason is advisable.
5. Inspect and Repair Flashing — Address the common leakage point where roof meets chimney.
- Look for bent, rusted, missing, or improperly sealed flashing pieces. Pay close attention to the counter flashing that is mortared into the chimney.
- For minor lifts or small gaps, carefully lift the loose flashing slightly and apply an generous bead of high-quality roofing cement or flashing sealant underneath.
- Press the flashing firmly back into place and seal any exposed edges with additional sealant. Secure with roofing nails if necessary, covering nail heads with sealant.
- For rusted or severely damaged flashing, replacement is the only effective solution. This is often a job best left to an experienced roofer due to the complexity of weaving new flashing into existing shingles and mortar joints.
6. Seal Around the Flue Liner — Prevent water from entering the flue opening.
- Check the sealant around the metal or clay flue liner at the top of the chimney crown. Over time, heat and weather can degrade this sealant.
- Clean the area thoroughly, removing any old, cracked sealant.
- Apply a fresh bead of high-temperature, exterior-grade silicone or chimney crown sealant, ensuring it creates a watertight seal between the flue liner and the crown.
7. Inspect and Seal Other Penetrations — Check for less obvious leak sources.
- Examine any vents, pipes, or other penetrations through the chimney for proper sealing. This can include exhaust vents for furnaces or water heaters.
- Apply exterior-grade sealant around any gaps or openings.
8. Water Test (Optional but Recommended) — Confirm your repair worked before the next rain.
- Only do this on a dry day. Using a garden hose with a spray nozzle, systematically wet down different sections of the chimney, starting from the lowest point (the flashing) and working your way up.
- Have someone inside observe the interior location of the leak. When the leak reappears after wetting a specific section, you've likely identified the problem area.
- Allow several minutes between sections to let water penetrate. If the leak stops after a repair, move to the next section.
Common Causes
- Cracked Chimney Crown: The concrete or stone slab on top of your chimney can develop cracks due to thermal expansion and contraction, allowing water to seep directly into the chimney structure.
- Deteriorated Mortar Joints: Over time, the mortar between bricks can crumble, creating porous pathways for water, especially during wind-driven rain.
- Damaged Flashing: The metal strips (flashing) that form the watertight seal between the chimney and the roof can become bent, rusted, separated, or improperly installed, leading to significant leaks.
- Damaged or Missing Cap/Spark Arrestor: While not a primary source of structural leaks, a missing or damaged chimney cap can allow excessive rain directly down the flue, which can then exit into the attic or living space if the flue liner isn't perfectly sealed.
- Porous Bricks: While less common, older or poor-quality bricks can become saturated with water, especially in freezing climates where freeze-thaw cycles can cause deterioration.
- Compromised Masonry: Spalling bricks (where the face of the brick peels off) or efflorescence (white, powdery deposits) can indicate water absorption and potential pathways for leaks.
- Incorrectly Installed Cricket: For wider chimneys (over 30 inches), a
Related Articles
Keep troubleshooting with these hand-picked guides from FixlyGuide:
- The Secret Culprit Behind Your Leaky Chimney (It’s Not Always the Obvious Fix) — A leaky chimney during rain can indicate several issues, from simple flashing problems to complex crown damage, requiring homeowners to dia…
- The Secret Culprit Behind Your Leaky Chimney (It’s Not Always the Obvious Flashing) — Discover the often-overlooked causes of chimney leaks during rain and how to tackle them with effective DIY solutions and prevention tips.
- The Secret Culprit Behind Your Leaky Chimney (It's Not Always the Obvious Fix) — Discover the often-overlooked causes of a leaky chimney during rain, beyond just a faulty cap, and learn practical steps to fix it.
- The 4 Hidden Reasons Your Chimney Leaks in Rain (And the Smart Fixes) — A leaky chimney during rain can hint at several underlying issues, from a faulty chimney cap to damaged flashing, all of which require prom…
- The #1 Mistake Homeowners Make with a Slow Kitchen Drain (and the Real Fix) — Before you reach for harsh chemicals, learn the right way to fix a slow kitchen sink drain and prevent future clogs.
- Is Your Gutter Sagging After Every Storm? The Hidden Flaw Most Homeowners Miss — Discover the overlooked reason your gutters sag after every storm and learn the lasting fix that most homeowners miss.
Frequently asked questions
How do I know if my chimney crown is cracked?+
Inspect the flat top surface of your chimney. Look for any visible fissures, hairline cracks, or areas where chunks of concrete have broken off. You may also see water stains running down the exterior of the chimney below the crown.
Can flashing be repaired or does it need to be replaced?+
For minor issues like small lifts, rust spots, or gaps in sealant, flashing can often be repaired with roofing cement or specialized sealants. However, if the flashing is severely rusted, torn, or improperly installed, full replacement by a professional roofer is generally recommended for a lasting fix.
What is efflorescence on a chimney and does it cause leaks?+
Efflorescence is a white, powdery deposit that appears on masonry and is caused by water dissolving salts within the brick or mortar and then evaporating, leaving the salts behind. While efflorescence itself doesn't cause leaks, its presence is a strong indicator of excessive moisture penetration into the chimney structure, which can indeed lead to leaks and long-term damage.
How often should I inspect my chimney?+
It's recommended to have your chimney inspected annually by a certified chimney sweep or mason. In addition, perform a visual inspection yourself from the ground periodically, especially after severe weather, looking for visible damage to the crown, mortar, or flashing.
Can a chimney leak even if I don't use it?+
Yes, absolutely. The chimney's primary function as a structural element is to protect your home from weather, regardless of whether you're using the fireplace or furnace. Leaks are almost always related to external weatherproofing issues like the crown, flashing, or mortar, not its operational use. An unused chimney can still deteriorate and leak over time.


Discussion
Loading comments…