Tools & materials you'll need
Affiliate links- AmazonHairdryerStandard household hairdryer
- AmazonWork glovesTo protect hands, especially if working in a cold area
- AmazonHeadlamp or flashlightFor better visibility in dimly lit areas
- AmazonAdjustable wrenchOnly if needing to tighten a minor leak post-thaw
- AmazonCaulking gun and caulkFor sealing small air leaks after the thaw
- AmazonElectric heating padOptional, as an alternative heat source
As an Amazon Associate FixlyGuide earns from qualifying purchases — at no extra cost to you. Prices and availability are accurate as of publication and subject to change.
Quick Answer
To safely thaw a frozen pipe, first locate the frozen section, which often occurs in pipes running along exterior walls, in crawl spaces, or unheated basements. Open the nearest faucet to relieve pressure and allow water to flow once the ice melts. Apply gentle, continuous heat using a hairdryer, heat lamp, or heating pad, starting from the faucet end and working backward toward the frozen section. This method helps melt the ice plug gradually and prevent pressure buildup. Never use an open flame, propane torch, or high-heat devices like blowtorches, as these can cause significant damage to pipes, ignite nearby materials, or lead to scalding injuries.
The Problem
Imagine waking up on a frigid winter morning, turning on the faucet, and nothing — or just a trickle — comes out. The culprit is often a frozen pipe, a common and potentially catastrophic issue for homeowners. When water inside a pipe freezes, it expands, creating immense pressure. This pressure doesn't just block water flow; it can cause the pipe to rupture, leading to extensive water damage once the ice thaws. The average cost of water damage from burst pipes can range from $5,000 to $20,000 or more, depending on the location and severity. Beyond the immediate inconvenience of no running water, a burst pipe can lead to damaged floors, walls, ceilings, insulation, and even electrical systems. Identifying and thawing a frozen pipe quickly and safely is crucial to prevent this expensive and disruptive outcome. Many homeowners instinctively reach for quick, high-heat solutions, but these often do more harm than good, turning a manageable problem into a disaster.
How It Works
Water expands by about 9% when it freezes into ice. Within the confines of a rigid pipe, this expansion generates tremendous pressure—upwards of 2,000 pounds per square inch (PSI) in some cases. This isn't just pressure from the forming ice plug itself; it's hydraulic pressure. When an ice blockage forms, it creates two sealed sections of water within the pipe. If more ice forms between the blockage and the closed faucet, the expanding ice has no place to go, exerting force in both directions. The copper, PEX, or PVC pipes, while durable, are not designed to withstand such internal pressures. Copper can withstand significant pressure before bursting, but the weakest points, such as joints or sections already stressed, are most vulnerable. PEX (cross-linked polyethylene) is more flexible and can often expand and contract without bursting, but it's not immune, especially at fittings. PVC (polyvinyl chloride) is more rigid and brittle in cold temperatures, making it particularly susceptible to freezing-induced ruptures.
The freezing process typically starts in exposed pipes that are poorly insulated or located in unheated areas like crawl spaces, attics, garages, or along exterior walls. As the ambient temperature drops below freezing (32°F or 0°C), the water molecules slow down and arrange themselves into a crystalline structure. This transition from liquid to solid phase causes the volumetric expansion. The longer the pipe is exposed to freezing temperatures, the deeper the freeze penetrates, and the larger and more robust the ice plug becomes. Thawing needs to be gradual and controlled. Applying sudden, intense heat can cause a rapid expansion of the ice and steam, exacerbating the pressure and potentially leading to a burst. Moreover, direct high heat can damage the pipe material itself, weakening it or even melting plastic pipes. The goal is to gently raise the temperature of the pipe and the ice within it above freezing, allowing the ice to melt back into water and flow away, relieving the pressure naturally.
Step-by-Step Fix
1. Identify the Frozen Location — Start by pinpointing the problem area.
Walk around your home, paying close attention to pipes in unheated areas like basements, crawl spaces, attics, garages, and under sinks against exterior walls. Look for visual cues like condensation, frost on the pipe's exterior, or a slight bulge. You might also hear faint dripping or gurgling sounds if the ice is partially melted, or you might find that only certain faucets are affected, indicating a freeze in a specific line. A small section of pipe or a sharp elbow is often the culprit.
2. Prepare the Area — Ensure safety and minimize potential mess.
Clear any items around the frozen pipe to give yourself ample working space. Lay down old towels or newspapers underneath the pipe to catch any water if the pipe begins to leak or if a small rupture has already occurred. This will protect your flooring and furniture. Ensure you have good lighting to clearly see the pipe and your working environment.
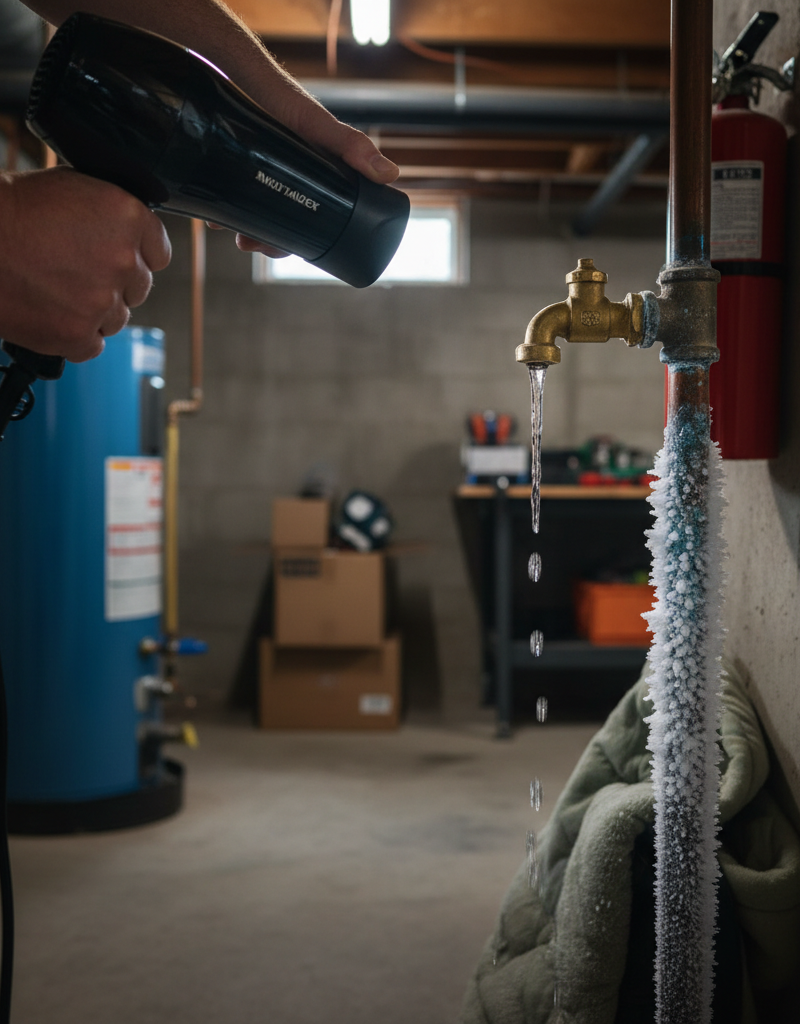
3. Open a Faucet — Relieve pressure and allow water to flow.
Crucially, open the cold water faucet connected to the frozen pipe. If the frozen pipe serves both hot and cold water (like a kitchen sink supply line), open both. This provides an exit path for the melting ice and helps relieve pressure as the ice plug starts to thaw. You might hear a hiss or rush of air as the pressure equalizes.
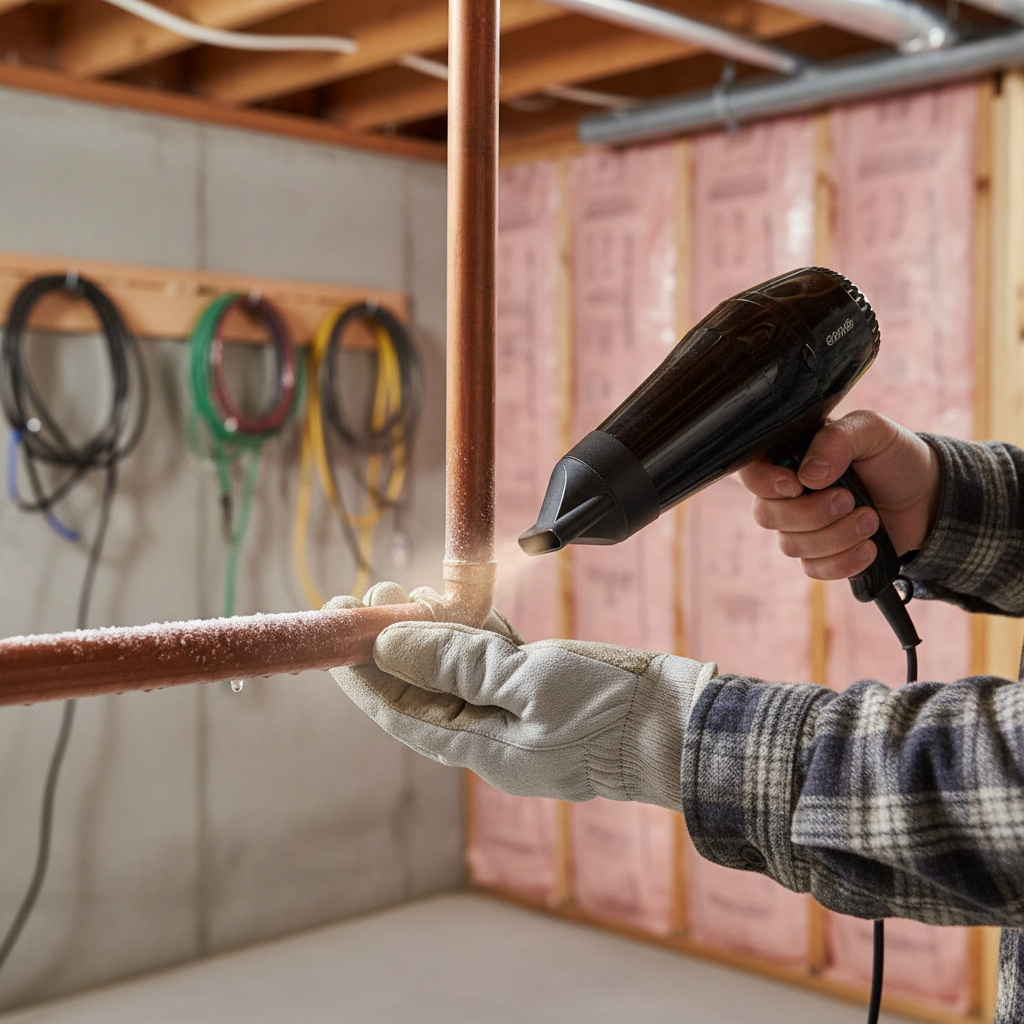
4. Apply Gentle Heat Gradually — The safest and most effective thawing method.
- Hairdryer: The safest and most common method. Set it to a medium or high heat setting and continuously move it back and forth along the frozen section of the pipe. Do not hold it in one spot for too long, as this can overheat the pipe material, especially with plastic pipes. Work from the open faucet side of the freeze backward.
- Heat Lamp: Position a heat lamp a safe distance (at least 1 foot) from the pipe, ensuring there are no flammable materials nearby. Monitor it closely to prevent overheating the pipe or surrounding structures.
- Electric Heating Pad: Wrap an electric heating pad around the frozen section. Secure it with tape or bungee cords, ensuring good contact with the pipe. Use a medium setting and check the pipe frequently.
- Warm Towels: Soak towels in hot water, wring them out, and wrap them around the pipe. Replace them frequently with fresh hot towels as they cool. This is a slower method but very safe.
- Avoid: Never use propane torches, blowtorches, kerosene or propane heaters, or other open-flame devices. These can easily ignite nearby materials, damage the pipe, and cause severe burns. Also, avoid high-voltage electric heaters if there's any chance of water leakage or contact.
5. Monitor Progress — Watch for signs of thawing and water flow.
Continue applying heat while regularly checking the open faucet. The goal is to see a trickle of water, which will eventually turn into a steady stream. As the water begins to flow, the ice is melting. Keep the faucet running until the water flow returns to normal. It might take 15-60 minutes, or even longer for larger freezes.
6. Check for Leaks — Crucial post-thaw inspection.
Once the water is flowing freely, carefully inspect the entire section of the pipe you thawed, as well as any nearby joints and fittings. Look for any drips, puddles, or cracks. Even a small hairline crack can lead to significant water damage over time. If you find a leak, immediately shut off the main water supply and call a licensed plumber.
7. Restore Heat and Prevent Recurrence — Protect your pipes from future freezes.
- Insulate: Permanently wrap exposed pipes in unheated areas with foam pipe insulation sleeves or heat tape. Ensure insulation covers all exposed sections, including elbows and valves.
- Airflow: Open cabinet doors under sinks on exterior walls to allow warmer room air to circulate around pipes.
- Drips: On extremely cold nights, allow a small, steady drip from a faucet on an exterior wall to keep water moving through the pipe, preventing it from freezing.
- Thermostat: Maintain a consistent home temperature, even when away. Set your thermostat to at least 55°F (13°C) to protect pipes.
Common Causes
- Lack of Insulation: Pipes located in unheated areas like crawl spaces, attics, garages, or exterior walls without adequate insulation are highly susceptible to freezing. Insufficient insulation allows ambient cold air to directly contact the pipe surface, dropping the water temperature below freezing.
- Sudden Temperature Drops: A rapid and severe drop in outdoor temperature, especially when combined with sustained cold, can overwhelm existing insulation and lead to pipes freezing quickly, even those not typically at risk.
- Drafts and Air Leaks: Gaps, cracks, or openings in your home's foundation, exterior walls, or around pipes entering the house can allow freezing winds and cold air to blow directly onto pipes, dramatically accelerating the cooling process.
- Extended Vacancies: When a home is left unoccupied and unheated for an extended period during cold weather, the indoor temperature can drop significantly, putting all pipes at risk, not just those in exposed areas.
- Poorly Sealed Basements/Crawl Spaces: Unsealed vents, inadequate insulation, and general cold-air infiltration in basements or crawl spaces create an ideal environment for pipes to freeze.
- Pipes Near Exterior Walls: Even inside heated spaces, pipes running directly within or along an exterior wall, especially on the north side of the house, are more exposed to cold and have a higher chance of freezing compared to interior pipes.
Common Mistakes
- Using an Open Flame: This is the most dangerous mistake. Blowtorches, propane heaters, or even candles can easily ignite nearby wooden structures, insulation, or curtain and cause severe fires. They can also superheat metal pipes, causing them to burst violently or even melt plastic pipes.
- Ignoring the Main Water Shut-Off: Not knowing where your main water shut-off valve is or forgetting to locate it before thawing is a critical error. If the pipe bursts during thawing, you'll have a massive flood and no way to stop it quickly.
- Applying Heat Too Quickly: Applying intense, localized heat too fast can cause the water inside to turn into steam, creating extreme pressure that can rupture the pipe. It's essential to apply gentle, even heat.
- Thawing from the Wrong End: Always thaw a pipe from the faucet end backward toward the freeze. Thawing the middle of a freeze first can trap expanding water between two ice plugs, creating immense pressure.
- Not Opening a Faucet: Forgetting to open a faucet allows pressure to build up as the ice melts, increasing the risk of a burst pipe. The open faucet provides an escape route for the melting water and any trapped air.
- Neglecting Post-Thaw Inspection: Assuming the problem is solved once water flows again is risky. A frozen pipe can develop a hairline crack that only becomes apparent when water pressure returns. Always meticulously check for leaks.
Cost & Time Breakdown
| Task | DIY cost | Pro cost | Time |
|---|---|---|---|
| Thawing a frozen pipe | $0–$20 | N/A | 15–60 minutes |
| Buying pipe insulation | $10–$50 | Incorporated | 30 minutes |
| Repairing minor pipe leak | $20–$100 | $200–$600 | 1–3 hours |
| Extensive water damage repair | N/A | $5,000–$20,000+ | Days to weeks |
Tips & Prevention
- Insulate Exposed Pipes: Wrap all pipes in unheated areas (crawl spaces, basements, attics, garages) with foam pipe insulation or heat tape. Don't forget outdoor spigots.
- Seal Air Leaks: Seal cracks and openings in your home's foundation and exterior walls, especially where utility lines enter, using caulk or expanding foam. This prevents cold drafts from reaching pipes.
- Drain Outdoor Spigots: Disconnect garden hoses and drain outdoor spigots before winter. If you have an interior shut-off valve for the spigot, close it and open the spigot to drain any remaining water.
- Keep Cabinet Doors Open: On extremely cold nights, open cabinet doors under sinks, especially those on exterior walls, to allow warmer room air to circulate around the pipes.
- Maintain Home Temperature: Keep your thermostat set to at least 55°F (13°C) even when you are away from home. A smart thermostat can help you monitor and adjust remotely.
- Allow a Faucet Drip: During severe cold snaps, consider letting a cold water faucet (especially one on an exterior wall) drip slightly. The constant movement of water can prevent freezing.
- Know Your Main Shut-Off: Locate your home's main water shut-off valve and know how to operate it. This is critical in case a pipe bursts.
- Consider a Plumber's Drain: For vacation homes or long absences, have a plumber completely drain your plumbing system to prevent freezing.
When to Call a Professional
While thawing a simple frozen pipe is a common DIY task, there are specific situations where you should immediately stop and call a licensed plumber. If you suspect or confirm a burst pipe and see water actively leaking, shut off your main water supply immediately and contact a professional. Dealing with significant water damage requires expertise to prevent further structural issues and mold growth. If the frozen pipe is located within a wall, ceiling, or otherwise inaccessible area, attempting to thaw it yourself can inflict more damage; a plumber has specialized tools and techniques to locate and thaw hidden pipes safely. If you've tried gentle thawing methods for an hour or more without success, the freeze might be extensive or in a particularly stubborn spot that requires professional attention. Finally, if you notice any signs of electrical arcing, sparking, or water near electrical outlets or appliances, shut off power at your main breaker and call an emergency plumber and an electrician, as this presents a severe electrical shock hazard.
Related Articles
Keep troubleshooting with these hand-picked guides from FixlyGuide:
- The 3 Hidden Reasons Your Pipes Freeze (And How to Thaw Them Fast) — Discover the real culprits behind frozen pipes and learn a step-by-step method to safely thaw them, preventing costly damage.
- The 3 Hidden Dangers of Frozen Pipes (And How to Thaw Them Safely) — Frozen pipes can burst, causing extensive water damage. Learn to safely thaw them and prevent costly repairs.
- The 90-Minute Hidden Danger of a Frozen Pipe (And the DIY Fix) — Thawing a frozen pipe quickly and safely is crucial to prevent bursting and extensive water damage to your home.
- The 4-Step Water Heater Flush That Adds Years to Its Life (and Cures 3 Common Problems) — Flushing your water heater annually is a quick DIY task that prevents sediment buildup, extends the unit's lifespan, and improves efficienc…
- The #1 Mistake Homeowners Make to Burst Pipes (and 5 Ways to Prevent It) — Learn the critical mistake most homeowners make when trying to prevent frozen pipes and discover five actionable strategies to protect your…
- The #1 Mistake Homeowners Make with Ice Dams (and How to Fix It SAFELY) — Most homeowners approach ice dam removal incorrectly, creating more damage or safety risks. Learn the right, safe methods to protect your r…
Frequently asked questions
How do you know if a pipe is frozen?+
The most obvious sign is a lack of water or very low water pressure from a faucet. You might also see visible frost on an exposed pipe, or hear a gurgling sound as water tries to pass a partial obstruction. Sometimes, a slight bulge in the pipe is visible where the ice has expanded.
What happens if a frozen pipe bursts?+
When a frozen pipe bursts, it creates a rupture in the pipe wall. Once the ice thaws, water will pour out of this rupture at full pressure, causing significant water damage to walls, floors, ceilings, and personal belongings. This can lead to costly repairs and potential mold growth.
Can I use a heat gun to thaw a frozen pipe?+
While a heat gun can provide intense heat, it's generally not recommended for thawing pipes. The high, concentrated heat can quickly overheat and damage plastic pipes, and even metal pipes can be stressed or burst due to rapid temperature changes and steam buildup. A hairdryer set to medium heat is a safer alternative.
How long does it take to thaw a frozen pipe?+
The time it takes depends on the severity and location of the freeze. A small, accessible freeze might thaw in 15-30 minutes with a hairdryer. More extensive or harder-to-reach freezes could take an hour or more. Patience and continuous, gentle heat are key.
How can I prevent my pipes from freezing in the future?+
Key prevention methods include insulating exposed pipes, sealing air leaks in your home's foundation, opening cabinet doors to expose pipes to warmer room air, keeping your thermostat set to at least 55°F (13°C) even when away, and allowing a small drip from faucets on extremely cold nights.


Discussion
Loading comments…