Tools & materials you'll need
Affiliate links- AmazonReplacement heating elementSpecific to your dryer's make and model
As an Amazon Associate FixlyGuide earns from qualifying purchases — at no extra cost to you. Prices and availability are accurate as of publication and subject to change.
Quick Answer
If your electric dryer is tumbling clothes but blowing only cold air, the most likely suspect is a burnt-out heating element. This critical component, a coiled resistance wire, is responsible for generating the heat needed to dry your laundry. Over time, particularly with lint accumulation or frequent use, the element can overheat and break, cutting off the heat supply. Fortunately, replacing a dryer heating element is a relatively simple and cost-effective DIY repair that most homeowners can accomplish in under an hour, restoring your dryer to full functionality without needing a costly service call.
The Problem
You've loaded your wet laundry, selected your cycle, and hit start, expecting warm, dry clothes. But after an hour, you pull out a load that's still damp and cold. Your dryer is running – the drum is spinning, the lights are on – but there's just no heat. This frustrating scenario almost always points to an issue with the heating system. While some gas dryers might have igniter problems or flame sensor failures, for electric dryers, the heating element itself is the number one culprit. A simple diagnostic can confirm this, saving you the expense and hassle of calling a technician for a repair you can easily do yourself.
How It Works
An electric dryer's heating system, though seemingly simple, involves a few key components working in concert. At its heart is the heating element, a long, coiled resistance wire, often made of Nichrome, housed within a metal casing. When electricity flows through this wire, its inherent resistance causes it to heat up, much like a toaster oven element.
Air is drawn into the dryer through an intake vent, typically at the back, by the blower motor. This air then passes over the superheated heating element, where it quickly absorbs the intense warmth. A thermistor or thermostat monitors the air temperature within the dryer ductwork, signaling the control board to cycle the heating element on and off, maintaining the desired temperature for optimal drying and preventing overheating.
The now hot, moisture-laden air is pushed through your wet clothes in the tumbling drum, extracting moisture. Finally, this warm, damp air exits the dryer through the lint trap and then into the exhaust vent system to the outside of your home. If any part of this delicate balance is disrupted – particularly the heating element – the entire drying process grinds to a halt. A burnt-out element means no heat generated, leading to an endless cycle of tumbling cold air.
Step-by-Step Fix
1. Safety First — Unplug the Dryer
- Crucial Step: Before touching any internal components of your dryer, you must completely disconnect it from its power source. For electric dryers, this means pulling the power cord from the wall outlet. Even if the dryer appears off, internal capacitors can hold a charge, and components remain live.
- Gas Dryers: If you have a gas dryer, in addition to unplugging it, you must also turn off the gas supply valve, typically a yellow-handled quarter-turn valve behind the dryer. Serious injury or death can result from electric shock or gas leaks.
2. Access the Heating Element — Remove the Rear Panel
- Tools: Phillips head screwdriver or nut driver (typically 1/4-inch or 5/16-inch).
- Process: Move your dryer away from the wall to give yourself ample working space. Locate the screws holding the large rear access panel in place. These are usually around the perimeter. Carefully remove all screws and set them aside in a container so they don't get lost. Gently pull the panel away. Be mindful of any wires or hoses attached to or near the panel.
- Pro Tip: Take a quick photo with your phone before you start disconnecting anything. This can be a lifesaver when reassembling.
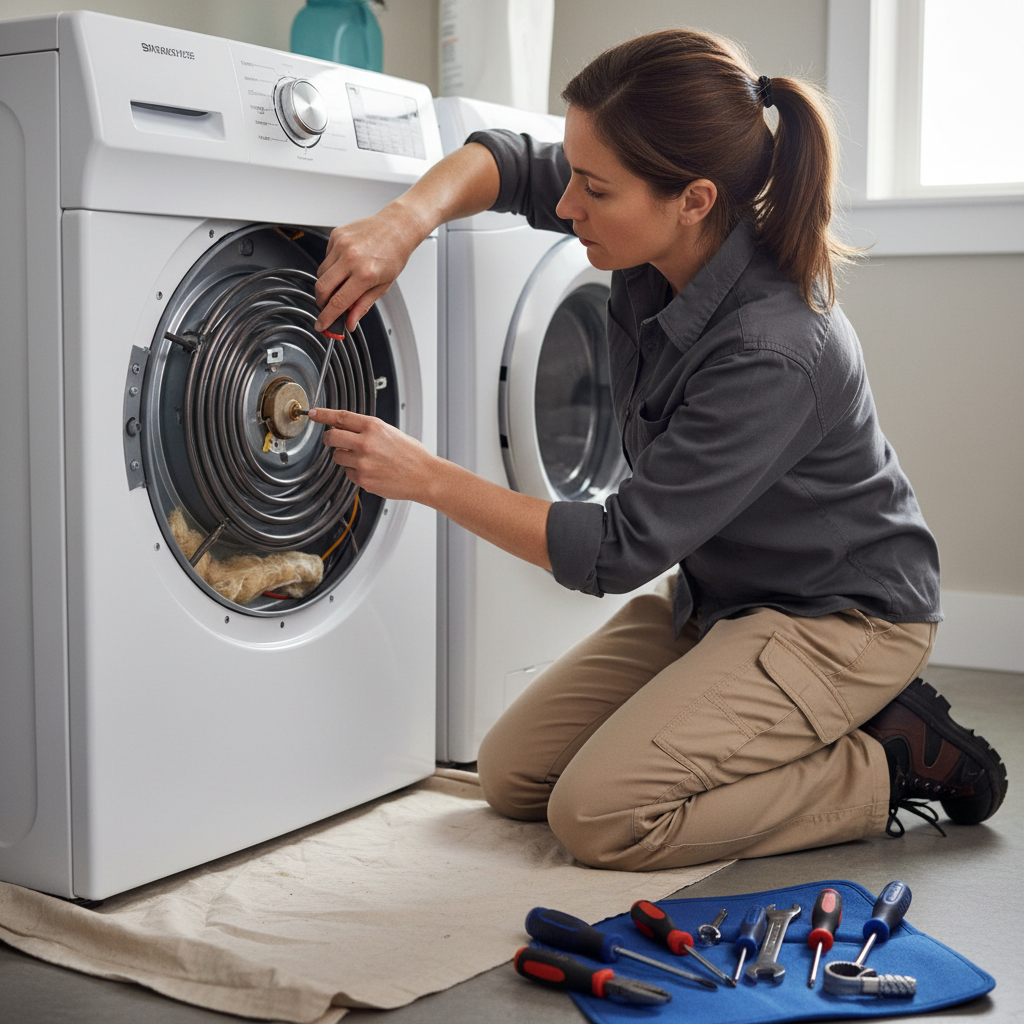
3. Locate the Heating Element Housing — Identify the Component
- Appearance: Inside the dryer, you'll see a large, typically rectangular or oblong metal housing, often silver or gray. This is where the heating element coils are located. It will have several wires attached to it.
- Identification: The heating element assembly is usually found in the lower rear section of the dryer, sometimes behind a ventilation duct or internal panel. Familiarize yourself with its position and how it's mounted.
4. Disconnect Wires and Components — Remove Thermostats and Wires
- Tools: Needle-nose pliers or nut driver.
- Process: You'll typically find two main power wires connected to the heating element assembly, along with potentially one or two high-limit thermostats or thermal fuses. Using needle-nose pliers, carefully pull the wire connectors straight off the terminals. They may be snug. If there are thermostats mounted directly to the heating element housing, use a nut driver to unscrew them and set them aside. Some models might have a grounded wire also attached.
- Key Detail: Pay close attention to which wire goes to which terminal if there are multiple. Again, a photo can be incredibly helpful here.
5. Remove the Old Heating Element Assembly — Unmount and Extract
- Tools: Phillips head screwdriver or nut driver.
- Process: The entire heating element housing is usually secured by a few screws to the dryer chassis. Unfasten these screws. Once all fasteners are removed, you should be able to carefully slide or pull the heating element assembly out of its cavity. Some models require a slight rotation or angling to clear internal components.
- Inspection: Once removed, visually inspect the old element. You'll often see a visible break, scorch mark, or sag in the coiled wire where it burnt out. This confirms your diagnosis.
6. Install the New Heating Element — Reverse the Process
- Process: Carefully unpack your new heating element. Ensure it matches the old one in size, shape, and terminal configuration. Slide the new heating element assembly into the cavity, making sure it sits flush. Secure it with the screws you removed earlier.
- Compatibility: Double-check that all mounting points align. Never force components into place.
7. Reconnect Wires and Thermostats — Restore Electrical Connections
- Process: Reattach any thermostats or thermal fuses to the new heating element housing using their screws. Then, firmly push the electrical wire connectors onto their corresponding terminals on the new heating element. Ensure they are fully seated and secure. Refer to your earlier photo if you're unsure about wire placement.
- Security Check: Give each wire a gentle tug to ensure it's not loose. Loose connections can lead to arcing and future problems.
8. Replace the Rear Panel — Secure and Test
- Process: Carefully position the rear access panel back onto the dryer, aligning all screw holes. Insert and tighten all the screws you removed in step 2. Ensure the panel is completely secure and there are no gaps.
- Final Check: Before plugging in, do a quick visual scan to ensure no tools were left inside the dryer and all wires are properly routed and secured.
9. Restore Power and Test — Confirm the Fix
- Process: Move the dryer back into its original position. Plug the power cord firmly back into the wall outlet. If it's a gas dryer, turn the gas supply valve back on. Load a small batch of damp towels or clothing. Select a heat cycle and start the dryer. After a few minutes, open the door and carefully feel inside the drum. You should feel warm or hot air circulating.
- Important: If you smell burning plastic or hear unusual noises, immediately unplug the dryer and re-inspect your work.
Common Causes
- Lint Buildup: This is by far the most common culprit. Excess lint in the dryer vent, lint trap housing, or around the heating element restricts airflow. When airflow is restricted, the heating element can't dissipate heat effectively, causing it to overheat and eventually burn out.
- Frequent Use: Like any electrical component, the heating element has a lifespan. Heavily used dryers, especially in large families, will put more stress on the element, leading to premature failure.
- Worn-Out Element: Over time, the Nichrome wire within the element can simply weaken and break due to repeated heating and cooling cycles.
- Faulty Thermostats/Thermal Fuses: While less common than a direct element failure, a faulty high-limit thermostat or thermal fuse that isn't cycling correctly can allow the element to overheat, or a blown thermal fuse will cut power to the element as a safety measure, mimicking a burnt-out element.
- Voltage Issues: Less frequently, inconsistent or incorrect voltage supply to the dryer can stress electrical components, including the heating element, leading to failure.
Common Mistakes
- Forgetting to Unplug the Dryer: This is the most dangerous mistake. Always, always disconnect power completely before beginning any dryer repair. Electrocution is a serious risk.
- Not Clearing Lint: Replacing the element without addressing underlying lint buildup is a temporary fix. Clogged vents will quickly lead to another burnt-out element. Thoroughly clean the vent system.
- Buying the Wrong Part: Dryer models vary widely. Always ensure you purchase the exact heating element specified for your dryer's make and model number. An incompatible part might not fit, or worse, could create a fire hazard.
- Over-tightening Screws: While it's important for connections to be secure, over-tightening screws, especially on plastic components, can strip threads or crack housings, leading to further issues.
- Ignoring Other Potential Issues: If the heating element has failed multiple times, or if other symptoms are present (like strange noises or clothes taking excessively long to dry even before the heat quit), it might indicate a deeper issue like a failing blower motor or extremely clogged vents that need professional attention.
- Leaving Wires Loose: Electrical connections must be tight and secure. Loose wires can generate heat, cause arcing, and potentially lead to a fire. Double check all connections before reassembly.
Cost & Time Breakdown
| Task | DIY Cost | Pro Cost | Time |
|---|---|---|---|
| New Heating Element | $20–$80 | $20–$80 (parts only) | N/A |
| Basic Tools (screwdriver, etc.) | $0–$20 | N/A | N/A |
| Labor (Pro) | N/A | $150–$300 | 1–2 hours |
| Total | $20–$100 | $170–$380 | 30–60 minutes |
Tips & Prevention
- Regular Vent Cleaning: Clean your dryer's lint trap after every single load. At least once a year, disconnect your dryer and thoroughly clean the entire exhaust ductwork from the dryer to the exterior vent cap. This is crucial for preventing fires and prolonging element life.
- Inspect the Vent Cap: Periodically check the exterior dryer vent cap to ensure it's not blocked by lint, debris, or even bird nests. A blocked exterior vent negates internal cleaning efforts.
- Avoid Overloading: Overloading your dryer restricts airflow, makes the element work harder, and can lead to premature wear and tear.
- Check for Airflow: While the dryer is running, go outside and feel the air coming from your exterior vent. It should be strong and warm (when the element is on). Weak airflow is a sign of a blockage.
- Professional Cleaning: Consider having your dryer and vent system professionally cleaned every 1-3 years, especially if you have a long or complex vent run.
When to Call a Professional
While replacing a heating element is a common DIY fix, there are several situations where calling a licensed appliance technician is strongly recommended. If you have a gas dryer and suspect an issue with the heating system (e.g., you smell gas, or the igniter isn't clicking), immediately turn off the gas supply and call a professional; never attempt to self-diagnose or repair gas lines or components due to the severe risk of fire or explosion. Likewise, if your electric dryer is still not heating after replacing the element, or if you also notice other complex electrical issues like tripping breakers, buzzing sounds, motor problems, or error codes, a professional can properly diagnose underlying electrical faults or control board failures. Furthermore, if accessing the heating element is unusually difficult, or you are uncomfortable working with electrical components, don't hesitate to call. Appliance technicians have specialized tools and diagnostic equipment to quickly identify and safely resolve complex issues that go beyond a simple element replacement, preventing further damage or safety hazards.
Related Articles
Keep troubleshooting with these hand-picked guides from FixlyGuide:
- The #1 Reason Your AC Blows Warm Air (And It's Not What You Think) — A dirty air filter is often the overlooked culprit behind an air conditioner blowing warm air, hindering its ability to cool your home effi…
- The #1 Mistake Homeowners Make Installing a Smart Thermostat (and How to Fix It) — Avoid the most common pitfall when installing a smart thermostat yourself and ensure a smooth, energy-efficient setup.
- The $5 Trick to Fix a Frozen AC Fan (and Why It Stops Spinning) — A non-spinning AC condenser fan can lead to system overheating and no cold air. Often, a simple, inexpensive fix can restore function.
- The 4 Hidden Reasons Your Dryer Tumbles Cold (And How to Fix Them in 30 Minutes) — Your dryer tumbles, but clothes stay cold. Discover the four most common culprits behind a dryer that won't heat, and how to troubleshoot t…
- The 5-Minute Trick Everyone Forgets When Their Dryer Stops Heating — Discover the often-overlooked first step that can fix a dryer that isn't heating in just five minutes, potentially saving you a costly repa…
- The Secret Reason Half Your Wall Outlet Dies (And It's Not What You Think) — Discover why only half of your electrical outlet might be working and how to diagnose and fix the common culprit, saving you from a costly…
Frequently asked questions
Why is my electric dryer tumbling but not heating?+
The most common reason for an electric dryer to tumble but not heat is a burnt-out heating element. This component generates the heat, and when it fails, only cold air will circulate. Other possibilities include a tripped thermal fuse or a faulty thermostat.
How much does it cost to replace a dryer heating element?+
Doing it yourself, a new heating element typically costs between $20 and $80, depending on your dryer model. Professional replacement can cost anywhere from $170 to $380, largely due to labor charges.
Can a clogged dryer vent cause the heating element to fail?+
Yes, absolutely. A clogged dryer vent restricts airflow, causing the heating element to overheat and eventually burn out prematurely. Regular vent cleaning is crucial for both dryer efficiency and preventing element failure, as well as reducing fire risk.
How long does it take to replace a dryer heating element?+
For most DIYers, replacing a dryer heating element takes approximately 30 to 60 minutes, assuming you have the right tools and the new part on hand. A professional might complete the job slightly faster.
What's the difference between a heating element and a thermal fuse?+
The heating element is the component that generates the heat through electrical resistance. A thermal fuse is a safety device designed to blow (open up) and cut power to the heating element if the dryer overheats, typically due to restricted airflow. If the thermal fuse is blown, the dryer won't heat.


Discussion
Loading comments…