Tools & materials you'll need
Affiliate linksAs an Amazon Associate FixlyGuide earns from qualifying purchases — at no extra cost to you. Prices and availability are accurate as of publication and subject to change.
Quick Answer
Low water pressure from your kitchen sink sprayer is a common and annoying problem, but one that homeowners can often fix themselves in under an hour. The most frequent culprits are mineral deposits (limescale) clogging the spray head or the diverter valve inside the faucet, or a kink or blockage in the sprayer hose. You can usually restore full pressure by systematically cleaning these components, often requiring nothing more than basic household tools and a little vinegar.
The Problem
You're trying to rinse dishes, clean the sink, or fill a pot, and your kitchen sink sprayer sputters weakly, delivers a pathetic dribble, or perhaps no water at all. This lack of pressure makes the sprayer largely useless and can be a significant frustration in a busy kitchen. It's rarely a sign of a major plumbing catastrophe but rather a localized issue within the sprayer system itself. While the main faucet might be gushing water, the sprayer remains underperforming, indicating the problem lies specifically with the diverter, hose, or spray head.
How It Works
To understand how to fix your kitchen sink sprayer, it's helpful to know how it's designed to work. When you turn on your kitchen faucet, water flows from the hot and cold supply lines, through the faucet's mixing cartridge, and typically out the aerator. However, when you engage the sprayer (either by pressing a button or lifting the sprayer from its cradle, depending on your model), a clever mechanism called a diverter valve redirects a portion, or all, of that water flow to the sprayer hose.
The diverter valve is usually a small, cylindrical component located inside the main faucet body, often near where the sprayer hose connects. It contains O-rings and sometimes a spring, designed to shift the water path. When water flows, pressure activates the diverter, closing off the main faucet spout and opening the path to the sprayer. When the sprayer is disengaged, the diverter returns to its resting position, allowing water to flow back to the main spout.
The water then travels through a flexible hose, usually made of reinforced rubber or braided stainless steel, to the spray head. The spray head itself contains a series of small nozzles designed to create a focused, high-pressure stream or spray pattern. Many modern sprayers also include a check valve or backflow preventer within the head to prevent contaminated water from flowing back into your clean drinking water supply, and these can also become clogged.
Mineral deposits, primarily calcium and magnesium found in hard water, are the most common cause of trouble. Over time, these minerals accumulate in the small passages of the spray head nozzles and, more critically, around the O-rings and moving parts of the diverter valve. This buildup restricts water flow, reduces the diverter's ability to operate smoothly, or can even cause the diverter to stick, preventing proper water redirection to the sprayer. A kinked or obstructed hose can also impede flow, acting like a pinched garden hose. Understanding this system is key to diagnosing and fixing the issue effectively.
Step-by-Step Fix
Before you begin, gather your tools and place a bucket or towels under the sink to catch any drips. Always work with the water supply OFF.
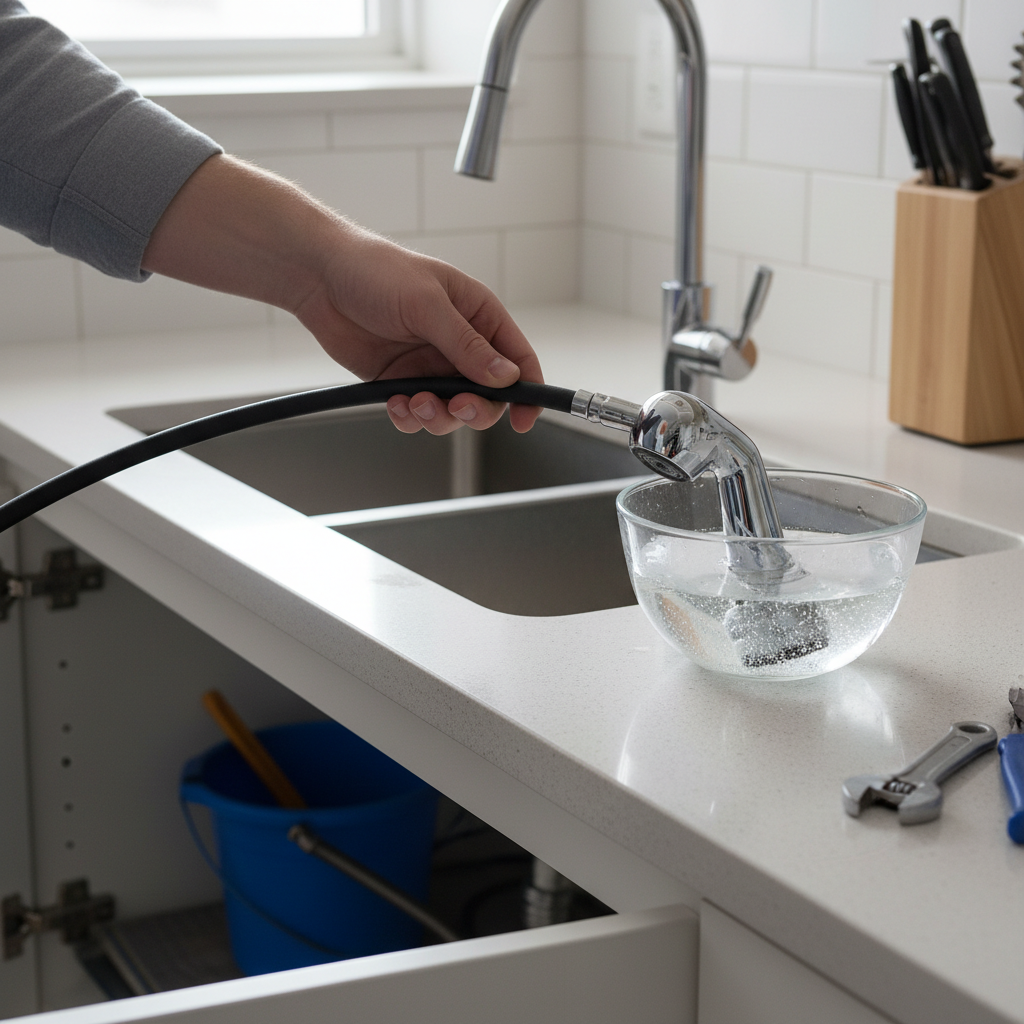
1. Disconnect and Inspect the Sprayer Head — *Start with the simplest fix first.
Unscrew the sprayer head counter-clockwise from the end of the hose. Check if the connection has a rubber washer; if so, make sure it's intact. Inspect the screen and nozzles inside the sprayer head for visible mineral buildup, debris, or blockages. This is the most common point of failure.
- Tools: Adjustable wrench (sometimes), pliers, old toothbrush.
- If clogged: Gently remove any large debris. For mineral buildup, soak the sprayer head in a bowl of white vinegar for at least 30 minutes, or even a few hours for severe buildup. Use an old toothbrush or a toothpick to scrub away softened deposits from the nozzles and screen. Rinse thoroughly with clean water before reattaching. If the sprayer head is severely damaged or doesn't improve after cleaning, it might need replacement.
2. Check the Sprayer Hose for Kinks or Obstructions — *A common, easily overlooked issue.
Trace the sprayer hose from underneath the sink where it connects to the faucet body, all the way to the spray head opening. Pull the hose out as far as it can go and untangle any twists or kinks. Run your hand along the entire length of the hose to feel for any collapsed sections or hard spots that could indicate an internal blockage or damage.
- Tools: Flashlight (optional).
- If kinked: Simply straighten the hose. Ensure it has enough slack to move freely without kinking when stored or extended. Try to reproduce the low pressure and see if the kink reappears. If the hose feels stiff or has a permanent crimp, it may need to be replaced. Internal obstructions might require replacing the hose.
3. Inspect and Clean the Diverter Valve — *Often the real culprit, requires accessing the faucet body.
This step requires more involved access to the faucet's underside. Turn off both hot and cold water supply valves under the sink. Turn on the faucet to relieve any residual pressure. Disconnect the sprayer hose where it attaches to the main faucet body (typically a threaded nut). Look into the connection port on the faucet body for a small, cylindrical component – this is the diverter valve. It might be pressed in, screwed in, or held by a retaining clip.
- Tools: Adjustable wrench, flathead screwdriver, needle-nose pliers, white vinegar, small brush or toothpick.
- Safety: Always turn off water supply before disconnecting parts of your plumbing system.
- If accessible: Carefully remove the diverter valve. Note its orientation and the position of any O-rings. Soak the diverter in white vinegar to dissolve mineral deposits. Use a small brush or toothpick to clean around the O-rings and any moving parts. Inspect the O-rings for wear, cracks, or flatness; replace them if damaged. Lubricate new or cleaned O-rings with plumber's grease before reassembly. Reinstall the diverter valve carefully in its original orientation.
- If you can't find it: Some newer faucets have the diverter integrated into the main cartridge or a non-serviceable part. Consult your faucet's manual. If you can't remove it or don't feel comfortable, it's time to consider professional help or faucet replacement.
4. Test the System — *Confirm your fix and check for leaks.
Reconnect the sprayer hose to the faucet body and the sprayer head. Hand-tighten connections, then use an adjustable wrench for a final quarter-turn, being careful not to overtighten. Slowly turn the hot and cold water supply valves back on. Check all connections for leaks. Turn on your main faucet and then engage the sprayer. Observe the pressure and spray pattern.
- If leaks occur: Gently tighten the connection further. If leaks persist, disassemble, check rubber washers or O-rings for proper seating, and reassemble.
- If pressure is still low: The diverter might be faulty and need replacement, or there could be a deeper issue with your water supply, though this is less likely if the main faucet has good pressure.
Common Causes
- Mineral Buildup (Limescale): The most frequent culprit, especially in hard water areas. Minerals accumulate in the tiny nozzles of the spray head and restrict the movement and flow through the diverter valve.
- Clogged Sprayer Screen/Nozzles: Debris, sediment, or mineral flakes can get trapped in the small openings of the spray head, physically blocking water flow.
- Faulty or Clogged Diverter Valve: The diverter valve, responsible for redirecting water, can become stiff with mineral deposits, damaged, or simply wear out, preventing it from fully opening the path to the sprayer.
- Kinked or Obstructed Hose: The flexible hose beneath the sink can get twisted, crimped, or kinked, restricting water flow similar to stepping on a garden hose. Internal blockages from debris or hose liner deterioration are rarer but possible.
- Worn or Damaged O-Rings: The rubber O-rings in the diverter valve or hose connections can degrade over time, leading to improper sealing and reduced pressure, or even leaks.
Common Mistakes
- Forgetting to Turn Off Water: Always, always shut off both hot and cold water supply lines under the sink before disconnecting any plumbing. Failure to do so will result in a messy flood and potential water damage.
- Overtightening Connections: Brass or plastic fittings can be easily stripped or cracked if overtightened. Hand-tighten first, then use a wrench for a gentle quarter-turn until snug, not extremely tight.
- Ignoring the Diverter Valve: Many homeowners clean the spray head, see no improvement, and assume the problem is bigger than it is. The diverter valve is a critical, often overlooked component.
- Using Harsh Chemicals: While store-bought descalers exist, strong chemical cleaners can damage rubber O-rings and plastic components within your faucet. White vinegar is a safe and effective descaler for most purposes.
- Not Inspecting O-Rings: When cleaning the diverter valve, don't just clean it; inspect the O-rings for wear and tear. A cheap O-ring replacement can save you from repeating the repair soon after.
- Replacing the Entire Faucet Prematurely: Often, a low-pressure sprayer can be fixed with a $5 part or even just a good cleaning. Don't rush to replace an entire faucet if the problem is localized and fixable.
Cost & Time Breakdown
| Task | DIY Cost | Pro Cost | Time |
|---|---|---|---|
| Clean Sprayer Head | $0–$5 | N/A | 5–15 min |
| Untangle/Inspect Hose | $0 | N/A | 5 min |
| Clean/Replace Diverter Valve | $5–$20 | $100–$250 | 30–60 min |
| Replace Sprayer Hose | $20–$50 | $100–$200 | 30 min |
| Replace Sprayer Head | $15–$60 | N/A | 10 min |
| Plumber Call-Out (General Fix) | N/A | $150–$400+ | 1–2 hours |
Tips & Prevention
- Regular Cleaning: If you have hard water, periodically (every 3-6 months) unscrew your sprayer head and soak it in white vinegar to prevent mineral buildup before it becomes a problem.
- Water Softener: Consider installing a whole-house water softener if hard water is a pervasive issue in your home. This will extend the life of all your plumbing fixtures and appliances.
- Gentle Hose Handling: Avoid yanking or forcing the sprayer hose, and ensure it retracts smoothly without getting twisted or crimped under the sink.
- Check for Leaks: Periodically inspect under your sink for any signs of small leaks, as these can indicate degrading O-rings or loose connections that will eventually affect pressure.
- Know Your Faucet Model: Keep your faucet's make and model number handy, or even the instruction manual. This makes it much easier to order specific replacement parts like a diverter valve or sprayer head if needed.
When to Call a Professional
While many low-pressure sprayer issues are DIY-friendly, there are situations where calling a licensed plumber is the wisest course of action. If you've methodically followed all the troubleshooting steps, cleaned the sprayer head and diverter, and confirmed the hose is clear, but pressure remains low, the issue might be more complex. This could involve a faulty main faucet cartridge that's not allowing enough water to reach the diverter, or a blockage further down the supply line that's affecting only the sprayer's flow path. If you discover a leak you can't seal, or if you're uncomfortable disassembling the faucet body and handling small components like the diverter valve and O-rings, a professional can complete the job quickly and correctly. Additionally, if your faucet is very old or an obscure model where parts are hard to find, a plumber can advise on the best course of action, including replacing the entire faucet if repair isn't cost-effective or feasible. Don't hesitate to call a pro if you're unsure or the problem persists after your best efforts.
Related Articles
Keep troubleshooting with these hand-picked guides from FixlyGuide:
- The 5-Minute Trick to Stop a Dripping Single-Handle Faucet (No Plumber Needed) — A persistent drip from your single-handle faucet is usually caused by a worn-out cartridge, a repair you can typically complete yourself in…
- The 4 Hidden Reasons Your Toilet Tank Fills Slowly (And How to Fix Them in Under an Hour) — A toilet tank that fills slowly is a common, annoying plumbing problem, often caused by easily fixable issues within the fill valve or wate…
- The $5 Secret to Fixing Your Drip: Why Single-Handle Faucets Leak (and the O-Ring Trick) — A persistent drip from your single-handle faucet is often caused by worn-out O-rings or seals, a common issue with a simple, inexpensive DI…
- The Secret Culprit Behind Your Washing Machine's Spin & Drain Failure (It's Not Always Clogs) — Discover the most overlooked reasons why your washing machine refuses to spin or drain, and how to fix them with simple tools.
- The 30-Second Toilet Fix Plumbers Don't Want You to Know — A running toilet can waste hundreds of gallons of water per day, but often the fix is incredibly simple and takes under a minute.
- The 4 Hidden Reasons Your Dryer Tumbles Cold (And How to Fix Them in 30 Minutes) — Your dryer tumbles, but clothes stay cold. Discover the four most common culprits behind a dryer that won't heat, and how to troubleshoot t…
Frequently asked questions
Why is my kitchen sink sprayer suddenly weak?+
The most common reasons for a weak kitchen sink sprayer are mineral buildup in the spray head nozzles, a clogged or faulty diverter valve inside the faucet body, or a kinked/obstructed sprayer hose underneath the sink.
Can I clean my sink sprayer head?+
Yes, absolutely! Unscrew the sprayer head and soak it in white vinegar for at least 30 minutes to dissolve mineral deposits. Use an old toothbrush or toothpick to scrub away any remaining debris from the nozzles and screen, then rinse thoroughly.
Where is the diverter valve in my kitchen faucet?+
The diverter valve is typically a small, cylindrical component located inside the main faucet body, usually near where the sprayer hose connects. You'll often need to remove the sprayer hose from the faucet body to access it.
What tools do I need to fix a low-pressure sprayer?+
For most fixes, you'll need an adjustable wrench, a flathead screwdriver (to pry some diverters), needle-nose pliers, an old toothbrush, white vinegar, and a bucket or towels.
When should I call a plumber for a weak sprayer?+
Call a plumber if you've tried cleaning the sprayer head, checking the hose, and cleaning/replacing the diverter valve, but the problem persists. Also, call a pro if you're uncomfortable working with plumbing components, encounter constant leaks, or suspect a larger issue with your main faucet or water supply.


Discussion
Loading comments…