Tools & materials you'll need
Affiliate links- AmazonFlathead screwdriverSmall size, suitable for fine adjustments
- AmazonSprinkler adjustment keyIf provided by manufacturer (e.g., Hunter, Rain Bird)
- AmazonWire brush or old toothbrushFor cleaning clogged nozzles
- AmazonSmall piece of wire/paperclipFor clearing stubborn nozzle clogs
- AmazonUtility knife or small trowelTo clear grass or dirt around head if obscured
- AmazonCatch cups or empty tuna cans3-5 · Optional, for precise water distribution measurement
As an Amazon Associate FixlyGuide earns from qualifying purchases — at no extra cost to you. Prices and availability are accurate as of publication and subject to change.
Quick Answer
Adjusting a sprinkler spray pattern is a straightforward task that can save you water and ensure your lawn gets proper hydration. For most pop-up sprinkler heads, you'll need to set the desired arc (the width of the spray) by rotating the nozzle and then adjust the throw distance using a small flathead screwdriver or a dedicated adjustment key. This allows you to fine-tune the coverage, preventing overspray onto sidewalks and driveways, and ensuring every blade of grass receives adequate water.
The Problem
Is your sprinkler system doing more harm than good? Perhaps you're seeing puddles on your driveway, soggy patches near your fence, or dry, brown spots in the middle of your lawn. These are classic signs of an improperly adjusted sprinkler spray pattern. When sprinkler heads aren't delivering water precisely where it's needed, it leads to significant water waste, increased utility bills, and an unevenly watered lawn that struggles to thrive. Over-watering hard surfaces can also create hazardous slippery conditions and contribute to wear and tear on pavements, while under-watering leads to stressed turf and bare spots. The problem isn't just cosmetic; it impacts the health of your landscape and your wallet.
How It Works
Understanding how a sprinkler head delivers water is key to adjusting it effectively. Most residential sprinkler heads operate on hydrostatic pressure, pushing water through a nozzle designed to create a specific spray pattern. There are generally two main types you'll encounter: pop-up spray heads and rotor heads.
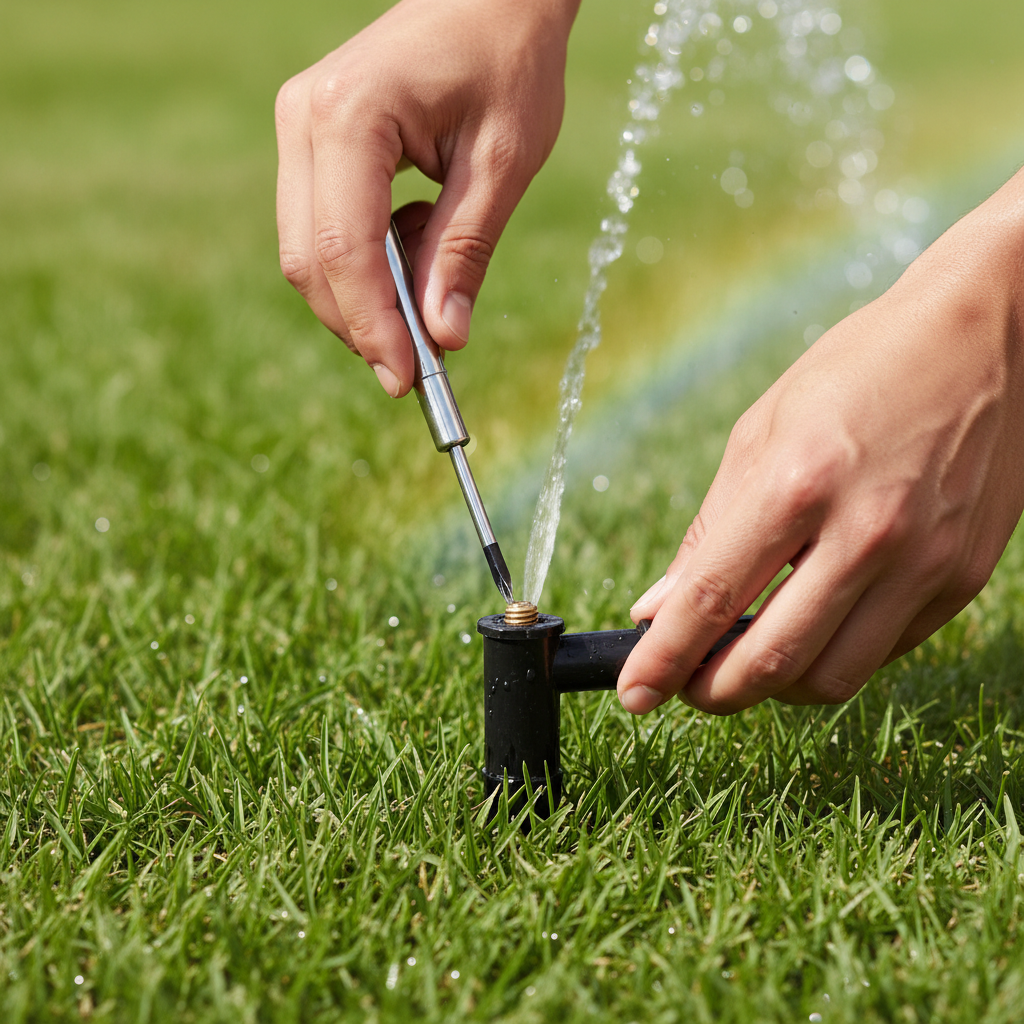
Pop-up Spray Heads: These heads typically pop up from the ground when water pressure is applied and spray a fixed pattern (e.g., quarter-circle, half-circle, full-circle) or an adjustable arc. The nozzle inside determines the shape of the spray. Many adjustable spray heads have a collar or small tabs that you can rotate by hand to set the left and right stop points of the arc. The distance the water travels, known as the 'throw,' is usually controlled by a small screw on the top of the nozzle. Turning this screw clockwise drives a 'diffuser' pin into the water stream, breaking it up and reducing the throw distance. Turning it counter-clockwise retracts the pin, increasing the throw.
Rotor Heads: These heads also pop up but have a single stream (or multiple streams) of water that rotates in a circle, covering a larger area than spray heads. Rotor heads have internal gears driven by water pressure that cause the nozzle to rotate. Adjustments usually involve setting the arc and the radius (throw distance). The arc is often set by rotating the nozzle to its left stop and then using a special key or flathead screwdriver to turn an adjustment screw that increases or decreases the arc's coverage. The radius is typically adjusted by another screw that disrupts the water stream, similar to a spray head, but sometimes employs interchangeable nozzles with different flow rates for distance control.
Both types rely on proper water pressure to function optimally. Too little pressure will result in a weak, short spray, while too much pressure can create misting and uneven distribution, especially for spray heads. The goal is to achieve head-to-head coverage, meaning the spray from one head reaches the base of the adjacent heads, ensuring uniform watering across the entire zone.
Step-by-Step Fix
Before you begin, identify which type of sprinkler head you have. The steps below cover the most common adjustable pop-up spray and rotor heads.
Safety Note: Always be aware of your surroundings when working with sprinkler systems. If you're using tools, ensure stable footing. Turn off the main water supply to the irrigation system before making any adjustments to avoid getting soaked or accidentally wasting water during setup.
1. Identify Your Sprinkler Head Type and Locate Adjustment Points
— Know your hardware. Before touching anything, let the system run briefly (30 seconds to a minute) to see exactly how each head is spraying. Note which areas are overwatered, under-watered, or completely missed. Most residential setups use either fixed spray heads, adjustable spray heads, or rotor heads. * Pop-up spray heads: These often have a small slot for a flathead screwdriver on top of the nozzle for distance adjustment and sometimes a notched collar for arc. The stream does not rotate. * Rotor heads: These are larger, typically have a single, more powerful stream (or multiple streams) that sweeps across an arc. They often have a small arrow or indicator for the left stop and a separate set screw for arc adjustment, usually requiring a special key or flathead screwdriver. They also have a screw for distance adjustment.
2. Turn On the Specific Zone for Adjustment
— Isolate the problem. Turn on only the irrigation zone that contains the sprinkler head(s) you need to adjust. This allows you to observe the spray pattern in real-time without wasting water on other parts of your yard. Make sure all other zones are off. * Pro Tip: If your controller allows, set the zone to a short run time (e.g., 2 minutes) for continuous observation. This prevents you from constantly turning it on and off.
3. Adjust the Arc (for Adjustable Spray and Rotor Heads)
— Define the coverage area. The arc is the portion of a circle that the sprinkler head waters. For many adjustable spray heads, you can grasp the riser (the part that pops up) firmly and twist the nozzle to set the left-most and right-most points of the spray. For rotor heads, locate the left stop indicator, then insert the adjustment key or flathead screwdriver into the arc adjustment slot and turn it to increase or decrease the arc. Most rotor heads are adjusted by rotating the nozzle all the way counter-clockwise to find the fixed left stop, and then using the key to increase the arc clockwise from there. * If you have fixed spray heads: These cannot have their arc adjusted. If the pattern is wrong, you may need to replace the nozzle with one that has the correct fixed arc (e.g., 90-degree, 180-degree). * Hunter Rotor Adjustment: For Hunter rotors, insert the key into the red slot and rotate clockwise to increase the arc. A full rotation is 360 degrees. The left stop is always fixed as you turn the nozzle counter-clockwise. * Rain Bird Rotor Adjustment: For Rain Bird rotors, the flathead screwdriver slot usually adjusts the arc. Turn clockwise to increase the arc. To find the left stop, turn the nozzle by hand all the way counter-clockwise until it stops.
4. Adjust the Throw Distance (Radius)
— Control the reach. Most sprinkler heads, both spray and rotor, have a small flathead screw on top of the nozzle that controls the throw distance. Turning this screw clockwise will push a small pin or deflector into the water stream, breaking it up and reducing the distance the water travels. Turning it counter-clockwise will retract the pin, allowing the water to spray farther. Make small adjustments and observe the effect. * Goal: The water should ideally reach the next sprinkler head in the zone (head-to-head coverage) or just short of it, without overspraying onto non-landscape areas. * Avoid over-tightening: Don't overtighten the screw. You only need to reduce the stream, not block it entirely.
5. Fine-Tune and Test
— Observe and refine. After making an adjustment, let the sprinkler run for a minute or two to observe the full spray pattern. Are there any dry spots? Is it still hitting hardscapes? Make small, incremental adjustments to the arc and distance until you achieve optimal coverage. Walk through the zone to visually confirm the water distribution. * Use catch cups: For a truly accurate assessment, place several catch cups (empty tuna cans or dedicated rain gauges) strategically throughout the zone. Run the system for 10-15 minutes, then measure the amount of water in each cup. Uniform readings indicate good coverage. * Check for obstructions: Ensure no plants or debris are blocking the spray pattern after adjustment.
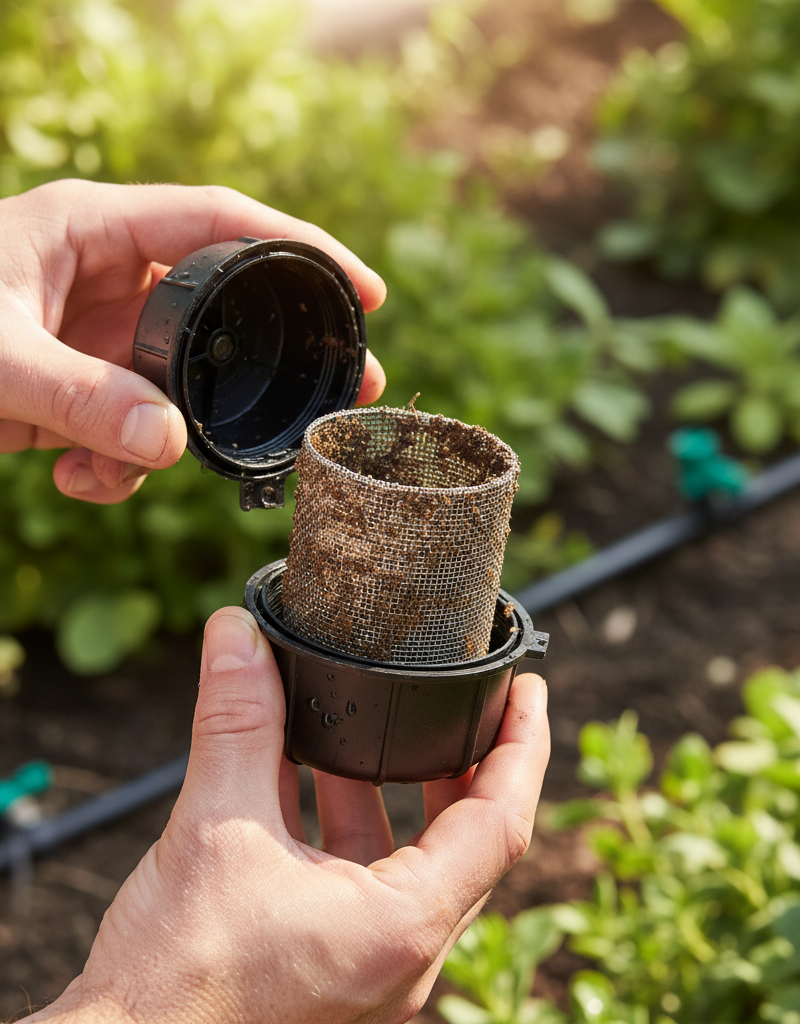
6. Verify Head Alignment and Clean Nozzles
— Ensure proper aiming and flow. Sometimes, a head may be leaning or clogged, affecting its pattern. Gently straighten any leaning pop-up risers. If the spray pattern looks erratic or weak even after adjustment, the nozzle might be clogged. Turn off the water, unscrew the nozzle, and rinse it clean of debris. A small wire or toothpick can help dislodge stubborn particles. * Important: If removing the nozzle, be careful not to lose any small internal parts like filters or springs.
Common Causes
- Original Installation Errors: Sometimes, sprinkler heads were simply installed without meticulous adjustment, leading to immediate inefficiencies.
- Landscape Growth: As plants, shrubs, and trees grow, they can obstruct spray patterns, requiring new adjustments to bypass or clear the obstructions.
- Physical Damage: Mowers, edgers, foot traffic, or even vehicles can knock heads out of alignment or damage nozzles, altering their spray.
- Pressure Fluctuations: Changes in water pressure (due to municipal supply, well pump issues, or other household water use) can affect how far and wide a sprinkler sprays.
- Clogged Nozzles: Dirt, debris, or mineral deposits can partially block a nozzle, causing an erratic or reduced spray pattern.
- Worn-Out Components: Over time, the internal mechanisms of a sprinkler head can wear, leading to looseness or inability to hold an adjustment.
Common Mistakes
- Adjusting without the Water On: Many DIYers try to manually manipulate the nozzle or screws without seeing the live spray, leading to guesswork and wasted effort. Always have the water running for precise adjustments.
- Over-adjusting the Distance Screw: Turning the distance screw too far clockwise can completely block the water flow or create a fine mist that evaporates before reaching the lawn, rather than providing effective coverage.
- Ignoring the Left Stop (Rotor Heads): For rotor heads, the left stop is often fixed. Trying to force it past its natural stop can damage the internal gearing. Understand how your specific rotor head adjusts its arc relative to this fixed point.
- Not Checking for Clogs First: Assuming the pattern is solely an adjustment issue when a simple clog is the culprit. Always check for debris in the nozzle if the spray is erratic or weak.
- Adjusting One Head in Isolation: Sprinkler zones are designed for head-to-head coverage. Adjusting one head perfectly without considering its overlap with neighboring heads can create new dry or overwatered spots.
- Using the Wrong Tools: Applying excessive force with ill-fitting tools can strip screws or damage plastic components, turning a simple adjustment into a replacement job.
Cost & Time Breakdown
| Task | DIY cost | Pro cost | Time |
|---|---|---|---|
| Simple Arc/Distance Adjustment | $0 | $75–$150 (service call) | 5–15 minutes per head |
| Nozzle Cleaning/Replacement | $5–$15 per nozzle | $75–$150 + parts | 10–20 minutes per head |
| Straightening/Minor Head Repair | $0–$10 (minor parts) | $75–$150 + parts | 10–20 minutes per head |
| Full System Audit & Adjustment | $0 (DIY) | $150–$300+ | 1–3 hours (team) |
Tips & Prevention
- Regular Visual Inspections: Once a month, especially during peak irrigation season, run each zone briefly and walk around to visually inspect every sprinkler head. Look for crooked heads, unusual spray patterns, or obvious leaks.
- Clean Nozzles Annually: At the beginning of the irrigation season, or if you notice changes, remove and clean all nozzles. This prevents mineral buildup and debris from affecting performance.
- Prune Landscaping: Keep shrubs, bushes, and groundcover trimmed back from sprinkler heads to prevent obstructions that can distort spray patterns and create dry spots.
- Avoid Mowing Over Heads: Be mindful when mowing or edging around sprinkler heads. Raising your mower deck slightly or using an edger carefully can prevent damage that leads to misalignment or broken components.
- Install Pressure Regulators: If you have consistently high or fluctuating water pressure, consider installing a pressure regulator at the main irrigation supply or on individual zones to maintain optimal operating pressure for your heads, reducing misting and ensuring consistent throw.
- Winterization Best Practices: Properly winterizing your system (blowing out the lines) prevents water from freezing and cracking heads or pipes, which would certainly impact spray patterns in the spring.
When to Call a Professional
While many sprinkler adjustments are DIY-friendly, there are specific situations where a licensed irrigation professional is your best bet. If you notice persistent low water pressure across multiple zones, indicating a main line issue, or if you suspect a leak in an underground pipe, it's time to call a pro. Similarly, if you've replaced or cleaned nozzles and diligently attempted adjustments, but still have significant dry or oversaturated patches, a professional can perform a comprehensive system audit. They have specialized tools to check pressure at each head, diagnose complex electrical issues with valves, and can pinpoint underlying problems that DIY methods can't address. For advanced diagnostics, major repairs involving digging up lines, or if you're planning a system expansion, a professional ensures the job is done correctly and efficiently, saving you headaches and potential costs down the line.
Related Articles
Keep troubleshooting with these hand-picked guides from FixlyGuide:
- The 3 Hidden Reasons Your Sprinkler Head Won't Pop Up (And How to Fix Them) — Frustrated by a sprinkler head that won't rise? Discover the top three culprits behind this common irrigation issue and how to resolve them…
- The #1 Lawn Aeration Mistake Most Homeowners Make (And When to REALLY Do It) — Discover the crucial mistake many homeowners make with lawn aeration and learn the optimal timing for a thriving, healthy lawn.
- The #1 Lawn Aeration Mistake Most Homeowners Make (And When to REALLY Do It) — Discover the crucial mistake many homeowners make with lawn aeration and learn the optimal timing for a healthier, more vibrant lawn.
- The #1 Watering Mistake That Kills Lawns (And How to Fix Yours in 10 Minutes) — Discover the most common watering mistake homeowners make and how to adjust your watering routine for a healthier, more resilient lawn.
- The #1 Summer Lawn Mistake Turning Your Grass Yellow (It's Not Overwatering) — Discover the most common, often overlooked reason your summer lawn is turning yellow despite your best efforts, and learn how to fix it.
- Is Your Gutter Sagging After Every Storm? The Hidden Flaw Most Homeowners Miss — Discover the overlooked reason your gutters sag after every storm and learn the lasting fix that most homeowners miss.
Frequently asked questions
How do I make my sprinkler spray further?+
To make your sprinkler spray further, locate the small flathead screw on top of the nozzle. Turn this screw counter-clockwise. This retracts a diffuser pin, allowing the water stream to travel a greater distance. Make small adjustments and observe the throw before making further changes.
Why is my sprinkler head spraying unevenly?+
Uneven sprinkler spray patterns are commonly caused by clogged nozzles, low water pressure, or obstruction from overgrown landscaping. First, check for and clear any debris from the nozzle. If the problem persists, you may need to adjust the spray arc and distance, or troubleshoot for pressure issues.
Can I adjust the arc on all sprinkler heads?+
No, not all sprinkler heads have adjustable arcs. Fixed spray heads are designed to spray a specific pattern (e.g., 90, 180, 360 degrees) and cannot be adjusted. Adjustable spray heads and rotor heads, however, do allow you to set or change their spray arc using a twist collar, special key, or screwdriver slot.


Discussion
Loading comments…