Tools & materials you'll need
Affiliate linksAs an Amazon Associate FixlyGuide earns from qualifying purchases — at no extra cost to you. Prices and availability are accurate as of publication and subject to change.
Quick Answer
Fixing an errant sprinkler spray pattern usually boils down to three core issues: a clogged or dirty nozzle, a sprinkler head that's too high or too low, or incorrect arc and radius settings. With a few basic tools and a clear understanding of how your sprinkler heads work, you can diagnose and correct these problems in a matter of minutes, ensuring your lawn gets the water it needs without wasting a drop on sidewalks or driveways. The most common adjustments involve cleaning the nozzle, adjusting the pop-up height, or fine-tuning the arc and throw distance directly on the sprinkler head.
The Problem
You've probably seen it: sprinklers ambitiously watering the concrete, drenching the side of your house, or creating mini-puddles in one spot while leaving another parched. An improperly adjusted sprinkler spray pattern doesn't just look bad; it's a significant source of water waste, can damage your home's foundation by oversaturating areas adjacent to the house, and leads to an unevenly watered, unhealthy lawn. This inefficiency can inflate your water bill and, over time, create conditions ripe for fungal growth or weed proliferation in overly wet areas, while dry patches suffer. The underlying issues are often quite simple to diagnose and resolve, but ignoring them can lead to larger, more expensive landscape problems.
How It Works
Understanding how a sprinkler head distributes water is key to effective adjustment. Most residential sprinkler systems use either spray heads or rotor heads. Both operate on the principle of pressurized water forcing its way through a specially designed nozzle to create a specific watering pattern.
Spray Heads are the simplest type, typically used for smaller areas (5 to 15 feet). They pop up and spray a continuous, fan-shaped stream of water. The spray pattern (e.g., quarter circle, half circle, full circle) is determined by the nozzle installed, and the throw distance (radius) is often fixed or subtly adjustable via a small screw on top of the nozzle that disrupts the water stream, effectively shortening its reach. The arc is generally fixed by the nozzle 's design or by rotating the entire riser assembly.
Rotor Heads are designed for larger areas (15 to 50+ feet). They also pop up, but instead of a continuous spray, they emit a single or multiple streams of water that rotate back and forth, or in a full circle. Rotors have more adjustable features. The arc (the angle of rotation, e.g., 90 to 360 degrees) is usually set with an adjustment key or screwdriver that turns a specific setting screw on the top of the head. The radius (how far the water throws) is also adjustable, typically with a radius reduction screw that extends into the water stream, breaking it up and reducing its throw. Some advanced rotors also allow for fine-tuning of the stream trajectory. The internal mechanism uses water pressure to drive a small turbine, which in turn rotates the nozzle assembly, distributing water over a larger area more slowly and efficiently than spray heads.
Both types rely on consistent water pressure to function optimally. If the pressure is too low, the spray won't reach its intended distance. If it's too high, the water can mist, leading to evaporative loss and uneven distribution. The goal of adjustment is to match the head's capabilities to the landscape's needs, ensuring overlapping coverage without wasteful overspray.
Step-by-Step Fix
Before you begin any adjustments, run your sprinkler system during daylight hours. This allows you to clearly see the spray patterns and identify which heads need attention. Start by observing the entire zone, noting any areas of overspray, underspray, or dry spots. Have your adjustment tool (usually a flat-head screwdriver or the specific key provided by the manufacturer) ready.
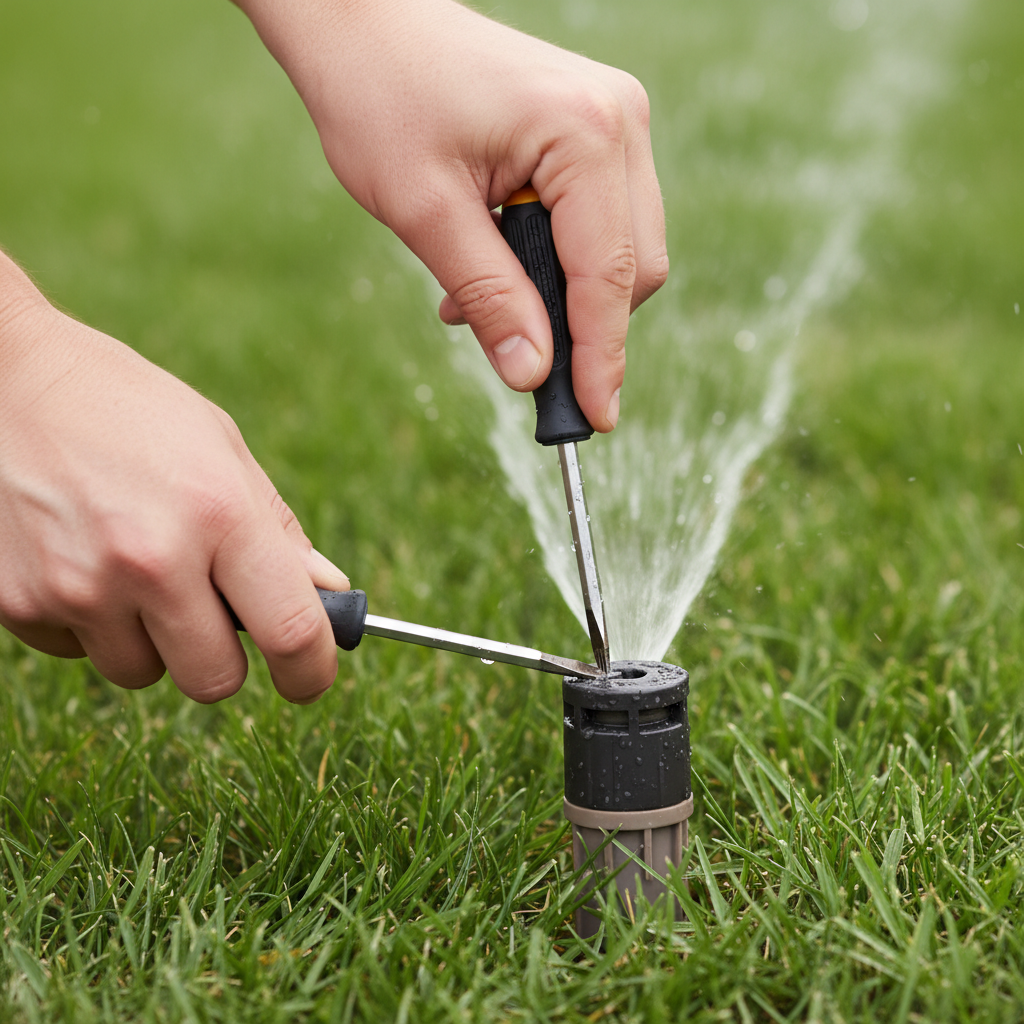
1. Clear Debris and Clean Nozzles – The first and easiest check for pattern issues.
- Action: Often, a poor spray pattern is due to dirt, grass clippings, or mineral deposits clogging the nozzle. Gently pull up the pop-up riser of the sprinkler head. For spray heads, unscrew the nozzle counter-clockwise. For rotors, the nozzle is usually integrated or has a small retaining screw. Rinse the nozzle thoroughly under running water, or use a soft brush/toothpick to remove any obstructions. Look for visible debris in and around the nozzle opening. Also, inspect the filter screen at the base of the nozzle (if present) and clean it.
- If this doesn't work: If cleaning doesn't restore the pattern, the nozzle might be damaged and require replacement. Most hardware stores carry common replacement nozzles for major brands.
2. Adjust Sprinkler Head Height and Alignment – Ensure the head sits flush with the ground and points correctly.
- Safety Note: Be mindful of walking on wet, potentially slippery surfaces around sprinkler heads. Avoid stepping on the active heads while they are operating.
- Action: If a sprinkler head is too high, it's prone to damage and can spray inefficiently. If it's too low, the spray may be obstructed by turf. The top of the pop-up head should be level with the surrounding turf when retracted. If it's not, you may need to dig carefully around the head. Add or remove risers (extension pieces) from the connection point below the head to adjust its height. Ensure the head is plumb (straight up and down) and not tilted. For spray heads, you can usually rotate the entire pop-up riser by hand to orient the fixed arc pattern correctly after cleaning or height adjustment.
- Pro Tip: Use a pair of channel-lock pliers with caution to gently loosen the connection if it's too tight to unscrew by hand, being careful not to overtighten when readjusting.
3. Set the Arc Pattern (for Rotor Heads) – Define the rotational sweep of the water.
- Action: Most rotor heads have an arrow or marker indicating the fixed left stop (the non-adjustable side of its rotation). Gently rotate the nozzle turret by hand, clockwise, until it stops at the left fixed position. This establishes your starting point. Then, insert the adjustment key (or a flat-head screwdriver, depending on the model) into the arc adjustment screw, usually marked with a plus (+) and minus (-) sign. Turn the screw clockwise to increase the arc and counter-clockwise to decrease it. Run the system to observe the new arc and fine-tune as needed. The arc should typically extend slightly beyond the area you want to water, overlapping with adjacent heads.
- Common Mistake: Adjusting the arc too wide, causing overspray onto hardscapes or neighboring properties. Aim for precise coverage within your lawn boundaries.
4. Adjust the Radius (Throw Distance) – Control how far the water travels.
- Action: Both spray and rotor heads typically have a radius reduction screw (sometimes called a stream deflector screw) located on the top of the nozzle. This is a small flat-head screw that, when turned clockwise, extends into the path of the water stream, breaking it up and shortening the throw distance. Turn it counter-clockwise to increase the throw. Make small adjustments (quarter turns at a time) and observe the effect. The goal is to have the water reach the edge of the intended watering area, just touching the throw of the next sprinkler head or the boundary of the lawn.
- Important: Over-tightening this screw can distort the spray pattern significantly or mist the water, reducing efficiency. Only turn it enough to achieve the desired distance.
5. Fine-tune Multiple Heads in a Zone – Achieve uniform coverage across the entire area.
- Action: Once individual heads are adjusted, run the entire zone for several minutes. Observe how the patterns overlap. You want 'head-to-head' coverage, meaning water from one head should reach the next head along its arc. This ensures even watering. If you have dry spots, you may need to slightly increase the radius of surrounding heads or adjust their arcs to compensate. Conversely, if you notice overly wet spots, reduce the radius or arc of the nearest heads. This often requires iterative adjustments.
- Troubleshooting: If you find significant pressure drops or uneven distribution across a zone, it might indicate a main line issue, a leaking valve, or mismatched sprinkler head types within the same zone, which can require professional diagnosis.
Common Causes
- Clogged Nozzles: The most frequent culprit. Dirt, debris, mineral buildup (hard water), or even insect nests can partially or fully block a nozzle, distorting the spray pattern or reducing its throw.
- Incorrect Head Height: Sprinkler heads that are too low can be obstructed by grass, while heads that are too high are vulnerable to damage and can spray erratically in windy conditions.
- Improper Arc/Radius Settings: Over time, settings can shift due to accidental bumps, vibrations, or initial incorrect setup, leading to overspray or underspray.
- Damaged Nozzle or Head: A cracked nozzle, a broken internal mechanism in a rotor head, or a worn-out seal can lead to water leaking or spraying improperly.
- Low Water Pressure: Insufficient water pressure can cause water to
Related Articles
Keep troubleshooting with these hand-picked guides from FixlyGuide:
- The 5-Minute Fix for Sprinkler Head Chaos (and Why It’s Spraying the Sidewalk) — Tired of your sprinklers watering everything but your lawn? Learn how to quickly adjust sprinkler spray patterns and coverage for a greener…
- The 3 Hidden Reasons Your Sprinkler Head Won't Pop Up (And How to Fix It Fast) — Uncovering why your sprinkler head isn't popping up often comes down to three common, easily fixable issues, helping you restore your lawn'…
- The 3 Hidden Reasons Your Sprinkler Head Won't Pop Up (And How to Fix Them) — Frustrated by a sprinkler head that won't rise? Discover the top three culprits behind this common irrigation issue and how to resolve them…
- The #1 Mistake Turning Your Healthy Lawn Brown After Watering — Discover the most common, overlooked reason your lawn develops brown spots right after you water it, and how to fix it with simple steps.
- The 3 Hidden Reasons Your Sprinkler Head Won't Pop Up (And How to Fix It FAST) — Discover the most common reasons your sprinkler head isn't popping up and follow our step-by-step guide to quickly diagnose and fix the iss…
- The 3 Hidden Reasons Your Toilet Tank Fills Slowly (And How to Fix Each) — Discover the common culprits behind a slow-filling toilet tank, from crucial valve issues to subtle obstructions, and learn how to restore…
Frequently asked questions
Why is my sprinkler spraying too far?+
Your sprinkler is likely spraying too far because the radius reduction screw is not tightened enough, or the nozzle itself is designed for a longer throw than needed. Turn the radius screw clockwise to shorten the throw, or consider replacing the nozzle with one designed for a shorter distance.
How do I stop my sprinkler from watering the sidewalk?+
To stop watering the sidewalk, first check for clogs in the nozzle. Then, adjust the arc setting (for rotors) or rotate the entire head (for sprays) so the pattern is directed away from the hardscape. Finally, use the radius reduction screw to shorten the throw distance so water lands within your lawn boundaries.
Can I adjust older sprinkler heads?+
Most older sprinkler heads, especially common brands like Rain Bird, Hunter, and Toro, allow for arc and radius adjustments using a flat-head screwdriver or a specific adjustment key. Clogged nozzles can also be cleaned or replaced on older models, often restoring their functionality.
What if my sprinkler head is stuck and won't turn?+
If a sprinkler head is stuck, it may be due to dirt buildup, mineral deposits, or a damaged internal gear (for rotors). Try cleaning around the head and carefully pulling up the riser. If it's a rotor, gently try to rotate the turret to its left stop. If it remains stuck after cleaning and gentle force, the internal mechanism might be seized, requiring replacement of the head.
How often should I check my sprinkler adjustments?+
It's a good practice to check your sprinkler adjustments at the beginning of each watering season and periodically throughout, especially after any major landscaping work or if you notice dry or overly wet spots developing. Quarterly checks are ideal for maintaining optimal performance and water efficiency.


Discussion
Loading comments…