Tools & materials you'll need
Affiliate linksAs an Amazon Associate FixlyGuide earns from qualifying purchases — at no extra cost to you. Prices and availability are accurate as of publication and subject to change.
Quick Answer
Many homeowners attempt to install floating shelves directly into drywall using standard anchors, only to find their shelves sag, wobble, or even pull out of the wall. The fundamental issue is that drywall alone cannot support significant weight. For a truly secure and lasting installation, you must locate and attach your floating shelf brackets to wall studs. Where studs aren't perfectly aligned, supplemental heavy-duty drywall anchors can be used, but the primary support should always come from lumber.
The Problem
You've measured, leveled, and carefully installed your beautiful new floating shelves, only to discover weeks later they're sagging, tilting, or worse, have pulled away from the wall entirely. This isn't just an aesthetic issue; it's a safety hazard, risking damage to your items and potential injury. The culprit is almost always inadequate attachment to the wall structure. Drywall, while robust enough for pictures and light decor, lacks the structural integrity to bear the concentrated load of a floating shelf, especially once loaded with books, dishes, or decorative objects. Without proper anchoring into a sturdy wall stud, the weight of the shelf and its contents will eventually cause the drywall to crumble around the anchors, leading to failure.
How It Works
Understanding how your wall is constructed is crucial for a successful floating shelf installation. Behind your drywall, you'll find a framework of vertical lumber pieces called studs, typically spaced 16 or 24 inches on center. These studs are the structural backbone of your wall, designed to support weight. Drywall, made of gypsum plaster pressed between sheets of paper, is simply a surface covering.
Floating shelves create a cantilevered load, meaning the weight is extended away from the wall, putting significant stress on the attachment points. If a mounting bracket is secured only into drywall with traditional anchors, the small surface area of the anchor can only distribute the load across a limited section of drywall. As weight is applied, this concentrated force can exceed the drywall's shear strength, causing the material to tear or compress around the anchor.
Conversely, when a bracket is screwed directly into a wood stud, the screw bites deeply into a solid, load-bearing material. This connection transfers the shelf's weight directly to the wall's structural frame, significantly increasing the holding power and stability. The goal is to maximize the number of attachment points that hit a stud and use the most robust drywall anchors available for any points that miss. Specialized floating shelf brackets often feature an internal metal rod or a sturdy bar that needs multiple, strong attachment points to prevent rotation and sagging.
Step-by-Step Fix
Here's how to ensure your floating shelves are securely installed into drywall, prioritizing stud connection.
-
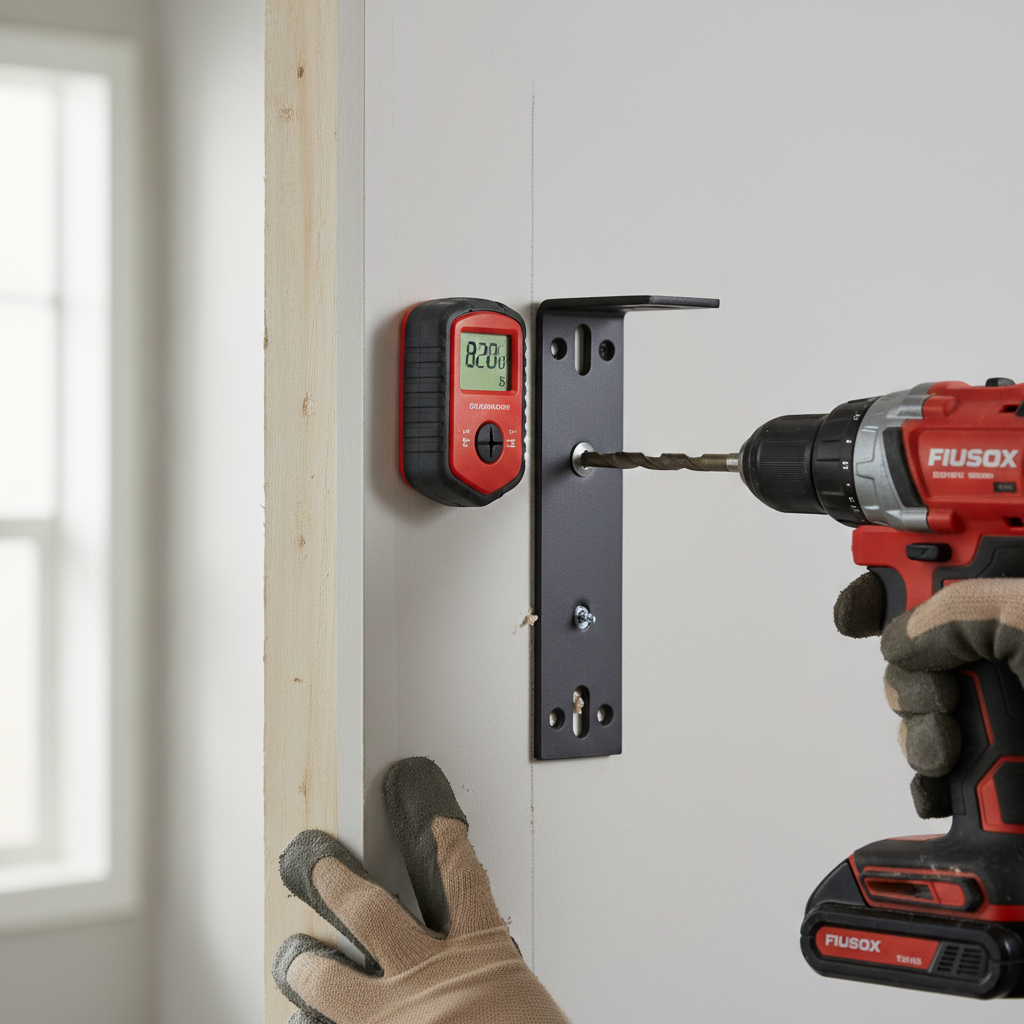
Locate Your Studs — The Foundation of Stability
- Use a stud finder to locate the vertical studs behind your drywall. Scan horizontally along the wall where your shelf will be placed, marking the center of each stud lightly with a pencil. Make sure to scan above and below your intended shelf height to confirm the stud's vertical path. Standard stud spacing is 16 or 24 inches on center.
- Tip: If your stud finder gives inconsistent readings, try using a small neodymium magnet to find the screws or nails holding the drywall to the studs. These indicate a stud location.
-
Mark Shelf Placement and Level — Precision is Key
- Hold your floating shelf bracket (or the shelf itself, if the mounting hardware is integrated) against the wall at your desired height.
- Use a carpenter's level to ensure the top edge of the bracket is perfectly horizontal.
- Lightly mark the locations where the mounting screws will go, paying close attention to where these marks align with your previously found stud centers.
-
Drill Pilot Holes for Studs — Prepare for a Strong Bite
- For any marked screw locations that align with a wall stud, select a drill bit slightly smaller than the diameter of your mounting screws. This creates a pilot hole that guides the screw and prevents the wood stud from splitting.
- Drill straight into the wall at these marked points, ensuring you penetrate the drywall and into the wood stud.
- Safety Note: Before drilling, ensure no electrical wires or plumbing lines are behind the wall in your chosen locations. Use a non-contact voltage tester around the area, especially if near outlets or switches.
-
Install Stud-Mounted Screws First — Prioritize Structural Connection
- Position your floating shelf bracket over the drilled pilot holes that hit studs.
- Using a power drill or screwdriver, drive the appropriate mounting screws (often included with the shelf or heavy-duty wood screws) firmly into the pilot holes until the bracket is snug against the wall. Do not overtighten and strip the screw head.
-
Address Non-Stud Locations with Heavy-Duty Anchors — Reinforce as Needed
- For any screw holes in your bracket that do not align with a stud, you'll need to install heavy-duty drywall anchors. Toggle bolts or self-drilling (E-Z Ancor style) metal anchors are good choices for this application, as they provide significantly more holding power than plastic expansion anchors.
- For Toggle Bolts: Drill a hole large enough for the toggle wings to pass through, then push the bolt and wings into the wall. Once through, the wings will spring open. Pull back on the bolt to seat the wings against the inside of the drywall, then thread the screw through your bracket and into the bolt.
- For Self-Drilling Metal Anchors: Use a power drill with a Phillips head bit to screw the metal anchor directly into the drywall until it's flush. Then, drive your mounting screw into the anchor.
- If this doesn't work: If you encounter unexpected obstruction or can't get an anchor to seat properly, consider shifting your shelf location slightly or using a different type of heavy-duty anchor. Sometimes, a stud may be positioned directly behind a spot where an anchor would go, requiring you to re-evaluate the stud spacing.
-
Secure All Remaining Screws — Even Distribution of Load
- Once your stud-mounted screws and heavy-duty anchors are in place, drive the remaining screws through your bracket and into the installed anchors. Again, ensure they are snug but do not overtighten, which can strip the anchor or damage the drywall.
-
Attach the Floating Shelf Body — Final Assembly
- Carefully slide your floating shelf onto the installed bracket. Many floating shelves have a hollow core with pre-drilled holes designed to slide over metal rods or a mounting bar.
- Secure the shelf to the bracket according to the manufacturer's instructions, often with small set screws located on the underside of the shelf. These screws prevent the shelf from shifting or lifting off the bracket.
-
Weight Test and Enjoy — Confirm Security
- Before loading your shelf with all your cherished items, gently apply some downward pressure to ensure it feels secure. Start with lighter items and gradually add more weight, periodically checking for any signs of movement or sagging.
Common Causes
- Ignoring Wall Studs: This is by far the biggest contributor to floating shelf failure. Relying solely on drywall for support is a recipe for disaster.
- Using Insufficient Anchors: Standard plastic conical drywall anchors or even small expansion anchors are not designed to support the dynamic load of a loaded floating shelf. They pull out or tear through the drywall under stress.
- Uneven Weight Distribution: Piling heavy items on one end of the shelf puts excessive strain on its nearest attachment points, accelerating failure.
- Overloading the Shelf: Even properly installed shelves have a weight limit. Exceeding this limit will eventually cause structural fatigue or failure.
- Improper Installation of Hardware: Not drilling pilot holes, overtightening screws, or not seating anchors correctly can compromise the integrity of the installation.
- Poor Quality Shelf Hardware: Some budget floating shelves come with inadequate mounting brackets or fasteners. Investing in robust hardware is crucial.
Common Mistakes
- Mistake: Assuming all drywall anchors are equal and sufficient for floating shelves.
- Instead: Always use heavy-duty anchors like toggle bolts, snap toggles, or robust self-drilling metal anchors for non-stud locations. Check the anchor's weight rating for shear strength.
- Mistake: Not confirming stud location with multiple scans or verification methods.
- Instead: Use a reliable stud finder and cross-reference by tapping the wall or using a magnet to locate drywall screws. Absolute certainty about stud location prevents disappointment.
- Mistake: Drilling pilot holes that are too large or too small for the screws/anchors.
- Instead: Use a drill bit that is slightly smaller than the screw shank for studs, and precisely follow anchor manufacturer instructions for hole sizing.
- Mistake: Forgetting to level the shelf bracket before drilling all holes.
- Instead: Mark and level thoroughly, then double-check before making any permanent holes. A slightly off-level shelf will always be noticeable.
- Mistake: Skipping the final set screws that secure the shelf body to its bracket.
- Instead: Always install these small screws. They prevent the shelf from sliding off or tilting unexpectedly, adding a crucial layer of security.
- Mistake: Overlooking potential electrical wires or plumbing behind the wall.
- Instead: Exercise extreme caution. Use a non-contact voltage tester. If in doubt, especially near outlets, switches, or plumbing fixtures, consult a professional.
Cost & Time Breakdown
| Task | DIY cost | Pro cost | Time |
|---|---|---|---|
| Stud finder (if needed) | $20–$50 | Included | 5–10 minutes |
| Heavy-duty anchors | $5–$15 | Included | 10–20 minutes |
| Floating shelf (material cost) | $20–$100+ | $20–$100+ | N/A |
| Installation of 1-2 shelves | $0 (your labor) | $100–$250 | 1–2 hours |
| Patching previous holes (optional) | $5–$10 | $50–$100+ | 30–60 minutes |
Tips & Prevention
- Pre-Plan Layout: Before buying shelves, plan their exact location. If shelves are long, aim for two or more stud connections per shelf.
- Distribute Weight Evenly: When loading your shelves, spread the weight out. Place heavier items closer to the stud connections.
- Regular Checks: Periodically check your floating shelves for any signs of sagging, wobbling, or separation from the wall. Address issues proactively.
- Don't Overload: Always refer to the shelf's manufacturer's weight capacity. If none is listed, assume a conservative limit (e.g., 10-15 lbs per stud-mounted bracket).
- Consider Shelf Type: Shelves with internal metal rod brackets (often found in higher-quality floating shelves) offer superior stability and weight capacity compared to those relying on a simple
Related Articles
Keep troubleshooting with these hand-picked guides from FixlyGuide:
- The #1 Mistake Homeowners Make Installing Floating Shelves (and How to Fix It) — Discover the crucial error many DIYers make when mounting floating shelves into drywall and learn the simple steps to ensure a secure, sag-…
- The #1 Mistake Homeowners Make Installing Floating Shelves (and How to Fix It) — Discover the most common error DIYers make when mounting floating shelves into drywall and how to ensure your shelves are sturdy and secure.
- The #1 Mistake Homeowners Make Installing Floating Shelves (and How to Fix It) — Discover the crucial mistake homeowners make installing floating shelves into drywall and learn the correct, secure method to prevent saggi…
- The 3 Common Floating Shelf Mistakes That Lead to Wall Damage — Learn the critical mistakes homeowners make when installing floating shelves into drywall and how to avoid them for a secure, lasting mount.
- The Giant Drywall Hole: 3 Hidden Mistakes That Make Fixing It Worse — Don’t just spackle over that huge drywall hole; learn the right way to repair it and avoid common mistakes that lead to an even bigger head…
- The #1 Sprinkler Winterizing Mistake That Leads to $1,000+ in Spring Repairs — Discover the crucial mistake many homeowners make when winterizing sprinkler systems, leading to costly spring repairs, and learn the right…
Get the print-ready PDF of this guide
A clean, ad-free, printable version you can keep on your phone or pin to the workshop wall. We'll also send occasional weekly tips matched to your home situation.
- Print-optimized layout
- Tools, materials & every step included
- Unsubscribe anytime
Frequently asked questions
Can I install a floating shelf directly into drywall without hitting a stud?+
While technically possible with heavy-duty anchors like toggle bolts or snap toggles, it is strongly discouraged for anything other than very light decorative items. For reliable support and to prevent sagging or collapse, always prioritize anchoring into wall studs. Drywall alone lacks the structural integrity for significant concentrated weight.
What is the best type of anchor for floating shelves in drywall?+
For areas where you cannot hit a stud, self-drilling metal anchors (like E-Z Ancor brand) are a moderate option for lighter shelves, but toggle bolts or snap toggles offer superior holding power and are recommended for floating shelves that will hold more weight. Always check the manufacturer's weight rating for the specific anchor type.
How much weight can a floating shelf hold if installed correctly?+
The weight capacity depends on several factors: the quality of the shelf and its bracket, the number of studs it's attached to, and the type of drywall anchors used. A properly installed floating shelf, with at least two stud connections and supplemental heavy-duty anchors, can typically hold 20-50 pounds per linear foot, but always refer to the specific shelf's manufacturer recommendations.
How do I find studs in my wall?+
The most common method is using an electronic stud finder, which detects changes in wall density or locates metal fasteners. You can also sometimes locate studs by tapping the wall and listening for a solid sound, or by using a small magnet to find drywall screws/nails which indicate a stud below.


Discussion
Loading comments…